Category Archives: Instructions

canopy tent instructions

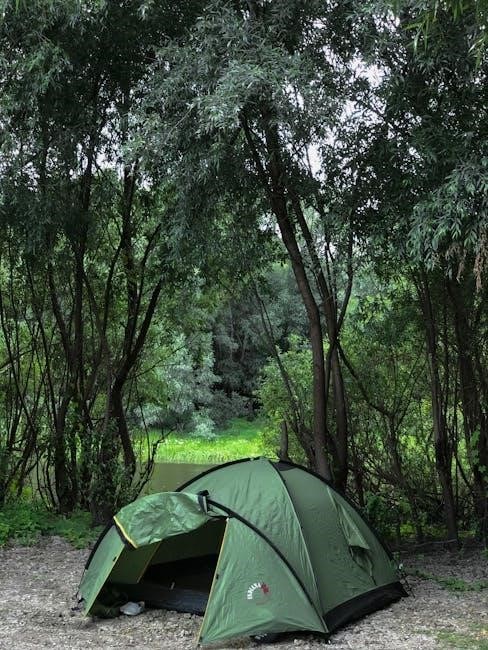
Successfully erecting a canopy tent requires understanding its components and prioritizing safety. A quality, fully enclosed rainfly is crucial for staying dry, alongside vestibules for gear.

Understanding Your Canopy Tent Components

A complete canopy tent setup typically includes several key components. First, you’ll have the frame, often constructed from steel or aluminum, providing the structural support. The canopy top, usually made of polyester or polyethylene, offers shade and protection from the elements.

Essential accessories often accompany the core components. Sidewalls provide enclosure and wind protection, while weight bags and stakes secure the tent to the ground. Don’t overlook the user manual; it’s invaluable, especially if the original is lost – most manufacturers offer downloadable versions online.

Remember, a full rainfly extending to the ground is vital for complete weather protection, preventing both external wetness and internal condensation. Vestibules, covered areas in front of doors, are excellent for gear storage.

Safety Precautions Before Assembly

Prior to assembling your canopy tent, carefully assess the surrounding area for potential hazards like overhead power lines or low-hanging branches. Ensure a level surface, avoiding slopes that could compromise stability.

Always work with a partner if possible; canopy tents can be unwieldy, and assistance speeds up the process and reduces strain. Be mindful of wind conditions – strong gusts can make assembly difficult and even dangerous.

Inspect all components for damage before beginning. Never attempt to use a damaged frame or canopy top. Remember, the “instant up” feature is often a gimmick; a well-practiced manual setup is generally more reliable. Prioritize a tent with a full rainfly for optimal protection.

Step-by-Step Assembly Guide

Follow these instructions carefully: unpack, extend the frame, lock it securely, and then attach the canopy top, ensuring a taut and stable structure.

Step 1: Unpacking and Inventory

Begin by carefully unpacking all components of your canopy tent. Lay everything out in a clear, spacious area to facilitate a thorough inventory. Confirm you have the frame sections, the canopy top, stakes, ropes, and any included sidewalls or accessories. Crucially, locate the user manual – if missing, search online using the model number. A “helping hand” is beneficial, but solo assembly is possible with practice. Ensure all parts are present before proceeding; missing components will halt progress. Double-check against the packing list to avoid frustration later. Having everything readily available streamlines the setup process and prevents unnecessary delays. Remember, a complete inventory is the foundation of a successful canopy tent assembly.

Step 2: Extending the Frame

With all components inventoried, begin extending the canopy frame. Most frames utilize a telescoping leg design; carefully pull each section to its full length, ensuring each locking button or pin clicks securely into place. Avoid forcing any section, as this could damage the mechanism. Lay the extended frame on a flat surface to maintain stability during the next steps. It’s helpful to have an assistant to hold sections steady. Practice extending and collapsing the frame a few times before full assembly to familiarize yourself with the process. A level frame is essential for a taut canopy top, so take your time and ensure each leg is fully extended and locked.

Step 3: Locking the Frame

Once the frame is fully extended, the crucial step is locking it into position. Locate the locking mechanisms – typically buttons, pins, or levers – at each joint of the frame. Firmly press or slide these mechanisms until they audibly click, indicating a secure lock. Double-check each joint to confirm it’s properly engaged; a loose connection can lead to frame collapse. Some frames feature height adjustment options at this stage, allowing you to customize the canopy’s height. Ensure all legs are set to the same height for a level canopy. A stable, locked frame is the foundation for successful canopy setup, preventing wobbling and ensuring safety.

Step 4: Attaching the Canopy Top

With the frame securely locked, carefully drape the canopy top over it. Align the corners of the canopy with the corresponding corners of the frame. Most canopy tops attach via Velcro straps, clips, or ties. Begin securing the canopy at opposite corners, working your way around the frame to distribute tension evenly. Ensure the fabric is taut but not overly stretched, preventing damage. Pay close attention to the direction of the canopy fabric – some designs have a specific orientation. A properly attached canopy top will be smooth and wrinkle-free, providing optimal shade and weather protection.

Securing Your Canopy Tent

Proper anchoring is vital for stability, especially in wind. Utilize stakes for ground anchoring or weight bags for hard surfaces, adjusting tension for a taut fit.

Step 5: Using Stakes for Ground Anchoring

When securing your canopy tent with stakes, begin by identifying the stake loops located on the corners and potentially along the sides of the canopy’s feet. These loops are designed to accommodate the stakes, providing a secure anchor point. Insert the stakes at a 45-degree angle, pointing away from the tent, to maximize holding power.

Ensure the stakes are fully hammered into the ground, leaving only a small portion exposed for removal; For softer ground, consider using longer, heavier-duty stakes. If encountering particularly hard ground, pre-digging a small hole can ease insertion and prevent bending the stake. Regularly check stake placement, especially during windy conditions, and readjust as needed to maintain a secure hold. Remember, proper staking is paramount for preventing your canopy from becoming airborne!

Step 6: Utilizing Weight Bags for Stability

For surfaces where staking isn’t feasible – like concrete or asphalt – or to supplement staking in windy conditions, weight bags are essential. These bags, typically filled with sand or water, provide substantial downward force, anchoring the canopy’s legs. Distribute the weight bags evenly around the perimeter of the tent, placing them over or securely attached to each leg.

Ensure the bags are adequately filled; a partially filled bag offers minimal stability. Consider the expected wind conditions when determining the amount of weight needed – heavier winds require heavier bags. Regularly inspect the bags for leaks or tears, and refill or repair as necessary. Weight bags are a crucial addition for ensuring your canopy remains grounded and secure, preventing potential damage or injury.

Step 7: Adjusting Tension for a Taut Canopy

Achieving a taut canopy top is vital for preventing flapping, water pooling, and overall structural integrity. Most canopies feature tensioning straps or cords attached to the canopy legs. Begin by evenly tightening these straps, working your way around the perimeter. Avoid over-tightening any single strap, as this can distort the frame.

Periodically check the tension, especially after initial setup and during changes in weather. A properly tensioned canopy will have a smooth, drum-like appearance, without significant wrinkles or sagging. If wrinkles persist, readjust the straps until a taut surface is achieved. Consistent tension ensures optimal performance and longevity of your canopy.

Adding Sidewalls and Accessories

Enhance your canopy with sidewalls for added protection, and consider doors and windows for convenient access and ventilation during use.

Step 8: Attaching Sidewalls (If Applicable)

Begin by carefully unpacking the sidewalls, identifying the correct orientation for each panel – often indicated by zipper placements or Velcro straps. Most sidewalls attach using a combination of these methods, connecting to the canopy frame or the canopy top itself. Start at a corner, aligning the sidewall’s attachment points with those on the canopy.

Securely fasten the sidewall using the provided Velcro straps, ensuring a snug fit to prevent gaps. If zippers are present, carefully zip the sidewall to the canopy top, working your way around the perimeter. Pay close attention to tension; avoid over-tightening, which could strain the fabric or attachment points. Repeat this process for each sidewall, creating a fully enclosed space. Double-check all connections for stability before proceeding.

Step 9: Installing Doors and Windows

Locate the designated openings for doors and windows on your sidewalls. These typically feature zippered closures for convenient access and ventilation. Begin by unzipping the door or window panel completely, allowing for easy installation. Carefully align the zipper track with the corresponding attachment points on the sidewall frame.

Gently zip the door or window into place, ensuring a smooth and secure closure. Test the zipper’s functionality to confirm it opens and closes effortlessly. For windows with mesh screens, verify the screen is properly seated within the opening. Secure any additional Velcro straps or fasteners to reinforce the door and window installations, preventing unwanted drafts or openings.

Step 10: Understanding Vestibule Setup

Vestibules, covered areas extending from the tent door, provide valuable sheltered storage. If your canopy includes a vestibule, locate the corresponding poles and attachment points. These often connect to the main frame, extending the canopy’s coverage. Carefully insert the vestibule poles into the designated sleeves or clips, creating the vestibule’s structure.

Secure the vestibule’s canopy fabric to the frame using hooks, clips, or Velcro straps. Ensure the vestibule’s rainfly overlaps the tent entrance, offering complete protection from the elements. Properly tensioned vestibule lines enhance stability and prevent water pooling. A well-setup vestibule keeps gear dry and accessible, maximizing your canopy’s functionality.

Troubleshooting Common Issues

Addressing frame locking, canopy attachment, and wind stability problems is vital. Prioritize a full rainfly and secure anchoring for optimal performance and dryness.

Step 11: Dealing with Frame Locking Problems

Encountering difficulty locking the canopy frame is a common frustration. First, ensure all legs are fully extended and at the same height; unevenness creates tension. Gently but firmly apply pressure to the locking buttons or levers, sometimes requiring a slight rocking motion of the frame.

If a section refuses to lock, inspect the connecting points for debris or damage. A small amount of silicone lubricant can ease movement, but avoid over-application. Don’t force it – excessive force can bend or break components. If the issue persists, double-check the assembly order against the manual, as incorrect sequencing can prevent proper locking. Remember, a helper can be invaluable for applying consistent pressure while you manipulate the locking mechanisms.

Step 12: Addressing Canopy Top Attachment Difficulties

Struggling to attach the canopy top? Begin by ensuring the frame is fully locked and stable. Lay the canopy top over the frame, aligning the corner straps or Velcro attachments with the corresponding frame corners. Work diagonally, attaching opposite corners first to distribute tension evenly.

If straps are too short, double-check the frame’s full extension. If they’re too long, adjust the strap length before securing. For Velcro attachments, ensure a firm, complete connection. A helper can hold the canopy in place while you secure the attachments. Avoid pulling excessively, which can tear the fabric or damage the frame. A properly fitted canopy top should stretch snugly, but not strain the frame.

Step 13: Resolving Stability Issues in Windy Conditions

Wind poses a significant threat to canopy tent stability. First, ensure all stakes are securely anchored into the ground, angled slightly away from the tent. Supplement stakes with weight bags placed on each leg – these are crucial for preventing lift-off.

Regularly check the tension of the canopy top; re-tighten straps if necessary. Avoid setting up the tent in overly exposed areas. If strong winds are unavoidable, consider partially disassembling the canopy, removing sidewalls to reduce wind resistance. Remember, an “instant up” design doesn’t guarantee wind resistance; a robust frame and secure anchoring are paramount for safety and longevity.

Maintenance and Care

Regular cleaning of the canopy top and proper frame care extend the tent’s lifespan. Store it completely dry to prevent mildew and damage.

Step 14: Cleaning the Canopy Top

Maintaining a clean canopy top is vital for longevity and performance. Begin by gently brushing off any loose dirt or debris with a soft-bristled brush. Avoid harsh chemicals or abrasive cleaners, as these can damage the fabric’s waterproof coating. Instead, opt for mild soap and lukewarm water.

For stubborn stains, create a diluted solution of the mild soap and water, applying it with a sponge or soft cloth. Gently scrub the affected area, then rinse thoroughly with clean water. Ensure all soap residue is removed to prevent stickiness or discoloration.

Allow the canopy top to air dry completely before storing it. Never use a dryer or direct heat, as this can shrink or warp the fabric. Regular cleaning will help preserve the canopy’s waterproof properties and extend its useful life, ensuring many more enjoyable outdoor experiences.

Step 15: Caring for the Frame

The canopy frame, typically constructed from steel or aluminum, requires regular care to prevent rust and ensure smooth operation. After each use, inspect the frame for any signs of damage, such as bends, cracks, or corrosion. Wipe down all metal parts with a clean, dry cloth to remove dirt and moisture.

For steel frames, apply a light coat of silicone lubricant to moving parts, like joints and locking mechanisms, to prevent rust and maintain flexibility. Avoid using oil-based lubricants, as they can attract dirt. Aluminum frames are naturally corrosion-resistant but still benefit from occasional cleaning.

Proper storage is crucial. Ensure the frame is completely dry before storing it in a cool, dry place. Disassembling the frame and storing the components separately can help prevent damage during transport and storage, extending its lifespan.

Step 16: Proper Storage Techniques

Effective canopy tent storage is vital for longevity, preventing mildew and damage. Before storing, ensure the canopy top and frame are completely dry – moisture breeds mold. Never pack a damp tent! Disassemble the entire setup, separating the canopy, frame, stakes, and any sidewalls.

Store the canopy top loosely folded in a breathable bag; avoid tight compression, which can cause creases. The frame components should be organized and stored in their original carry bag or a similar protective container. Keep stakes and smaller parts in a separate, labeled bag to prevent loss.

Choose a cool, dry storage location away from direct sunlight and extreme temperatures. Attics and basements can be suitable, but ensure adequate ventilation. Regularly inspect the stored tent for any signs of damage or mildew.

Advanced Setup Considerations

For challenging terrain, adjust frame legs individually. Combining multiple tents requires secure connections and shared sidewalls for a cohesive, larger space.

Step 17: Setting up on Uneven Ground

Dealing with an uneven campsite demands a flexible approach to canopy tent setup. Begin by identifying the lowest points of the ground beneath where each leg will rest. Instead of forcing the frame to conform, utilize adjustable legs – a feature found on many quality canopies – to independently level each corner. Extend or retract each leg as needed to achieve a stable, horizontal frame.

If your canopy lacks adjustable legs, consider using small, flat stones or wooden shims under the feet to compensate for minor height differences. Avoid large or unstable objects, as these can compromise the tent’s stability. Regularly check the frame’s level throughout the setup process, ensuring it remains balanced and secure. Prioritize a stable base before attaching the canopy top to prevent undue stress on the frame;

Step 18: Combining Multiple Canopy Tents

Creating a larger sheltered area by joining multiple canopy tents requires careful planning and appropriate connectors. While not all canopies are designed for interconnection, many manufacturers offer compatible side panels or joining kits specifically for this purpose. These kits typically involve heavy-duty zippers, Velcro straps, or buckle systems to securely fasten the canopies together.

Ensure the ground beneath each canopy is level and stable before attempting to connect them. Align the canopies closely, minimizing gaps between the frames. Securely attach the connecting panels or straps, ensuring a watertight seal if rain protection is a concern. Regularly inspect the connections for tightness, especially in windy conditions, to prevent separation and maintain structural integrity.

Rain Protection and Condensation

A full rainfly extending to the ground is vital for complete weather protection, preventing both direct wetting and internal condensation buildup.

Step 19: Importance of a Full Rainfly

The rainfly is arguably the most critical component for effective weather protection with your canopy tent. Unlike partial rainflies, a full rainfly extends all the way to the ground, creating a complete barrier against rain and moisture. This design prevents water from splashing onto the tent walls during rainfall, keeping the interior dry even during heavy downpours.

Furthermore, a full rainfly minimizes the risk of condensation buildup inside the tent. Condensation occurs when warm, moist air comes into contact with the cooler tent walls. By providing an extra layer of insulation and ventilation, a full rainfly helps regulate temperature and reduce moisture accumulation. Investing in a canopy tent with a comprehensive rainfly is essential for a comfortable and dry camping experience, especially in unpredictable weather conditions.

Step 20: Managing Condensation Inside the Tent

Condensation within a canopy tent is a common issue, stemming from warm breath and moisture released during sleep. While a full rainfly helps, it doesn’t eliminate condensation entirely. Proper ventilation is key; open vents or slightly unzipping doors allows moist air to escape, reducing buildup.

Avoid touching the tent walls, as this transfers moisture to your gear or clothing. Using a groundsheet helps prevent moisture from rising from the earth. Consider a breathable tent material to facilitate airflow. Regularly wiping down interior surfaces with a cloth can also help manage condensation, ensuring a more comfortable and dry camping experience, even in humid conditions.

Choosing the Right Canopy Tent

Prioritize a tent with a full rainfly for complete weather protection, and consider weight if backpacking; avoid expensive, heavy options initially.

Step 21: Considering Tent Weight and Portability

When selecting a canopy tent, carefully evaluate its weight, especially if you anticipate frequent transport or use in remote locations. A heavier tent, while potentially more durable, can become a significant burden during setup and takedown, and challenging to move.

For casual backyard events or car camping, weight may be less critical. However, if you envision transporting the tent long distances or carrying it over uneven terrain, a lighter model is highly recommended.

Consider the packed size as well; a compact tent is easier to store and transport. Avoid investing heavily in a costly, heavy tent if you’re exploring ultralight backpacking options, as your needs may quickly evolve. Starting with a lighter, more versatile shelter is often a wiser investment.

Step 22: Budget Considerations (Under $100 vs. Higher-Priced Options)

Establishing a budget is crucial when purchasing a canopy tent. While options under $100 exist, they often compromise on quality and durability; These tents may suffice for infrequent, casual use, but expect a shorter lifespan and potentially compromised weather resistance.

Investing around $100 or more unlocks significantly better construction, materials, and features like a full rainfly – essential for staying dry. Retailers like REI frequently offer sales and clearance items within this price range.

Avoid overspending on a heavy, expensive tent if you’re unsure about long-term needs. Prioritize a well-constructed, reliable shelter over flashy “instant-up” gimmicks, which often sacrifice quality. A modest investment now can save money and discomfort later.

Finding Replacement Parts and Manuals

Locate missing components or instructions by checking the manufacturer’s website using your tent’s model number for downloadable manuals and parts lists.

Step 23: Locating Downloadable User Manuals Online

Often, the printed user manual gets misplaced or lost during storage or transport. Fortunately, most canopy tent manufacturers provide downloadable versions of their manuals directly on their websites. Begin by identifying the precise model number of your canopy tent – this is usually found on a label affixed to the canopy top or the frame itself.

With the model number in hand, navigate to the manufacturer’s official website. Utilize the site’s search function, typically located in the header or footer, and enter the model number. Look for a “Support,” “Downloads,” or “Manuals” section. Many companies organize their resources this way.

Alternatively, a broader web search using the manufacturer’s name and the model number, coupled with the term “manual” or “user guide,” can yield direct links to the PDF document. Ensure the website source is legitimate to avoid downloading potentially harmful files.

chef’s choice diamond hone knife sharpener 110 instructions

Welcome! This manual guides you through utilizing your Chef’sChoice 110. Discover how to effortlessly restore and maintain the razor-sharp edge of your valuable kitchen knives with ease.

This guide unlocks the full potential of your new sharpening system, ensuring optimal performance and longevity for all your blades.

What is the Chef’sChoice 110?

The Chef’sChoice 110 is a three-stage, pull-through knife sharpener designed for home kitchen use. It’s engineered to sharpen a wide variety of knives, restoring their edge to a remarkably keen state. Unlike traditional sharpening methods that require skill and practice, the 110 simplifies the process, making professional-quality sharpening accessible to everyone.

This model utilizes diamond abrasives – specifically, diamond stones – to remove metal and reshape the blade. It’s a manual sharpener, meaning it doesn’t require electricity, offering convenience and portability. The 110’s key strength lies in its ability to consistently deliver a sharp, durable edge with minimal effort. It’s a popular choice for those seeking a reliable and user-friendly solution to maintain their knife collection.

Essentially, the Chef’sChoice 110 is a compact, efficient tool that brings the benefits of professional knife sharpening directly into your kitchen, ensuring your knives are always ready for any culinary task.

Key Features and Benefits

The Chef’sChoice 110 boasts several key features. Its three-stage system – coarse, fine, and polishing – provides comprehensive sharpening. Diamond abrasives ensure fast and effective metal removal, while pre-set 15° and 20° angle guides simplify the process for consistent results. This eliminates guesswork and prevents damage to your blades.

Benefits include a remarkably sharp edge, improved knife performance, and increased safety in the kitchen. The 110 is suitable for a variety of knives, including stainless steel and high-carbon blades. Its compact design saves counter space, and the manual operation means no batteries or cords are needed.

Furthermore, the Chef’sChoice 110 extends the life of your knives by restoring their edge, reducing the need for frequent replacements. It’s a cost-effective solution for maintaining a high-quality knife collection, offering professional results with minimal effort and expertise.

Understanding the Components

Explore the 110’s design! It features diamond abrasives, precision angle guides (15°/20°), and three distinct stages for sharpening, honing, and polishing your knives.

Diamond Abrasives – Coarse vs. Fine

The heart of the Chef’sChoice 110 lies in its diamond abrasives. These aren’t simply any diamonds; they are specifically engineered to remove metal and reshape the knife’s edge. The sharpener utilizes two distinct types: coarse and fine, each serving a crucial role in the sharpening process.

Coarse diamond abrasives are responsible for the initial reshaping of a dull or damaged blade. They rapidly remove metal, effectively establishing a new edge angle. Think of it as the foundational step, correcting significant dullness or chips. This stage is more aggressive and noticeable in its action.

Fine diamond abrasives, conversely, refine and polish the edge created by the coarse stage. They remove microscopic amounts of metal, resulting in a remarkably sharp and smooth cutting surface. This stage isn’t about reshaping, but about perfecting the edge for optimal performance. The fine abrasives create a burr-free, razor-sharp finish.

Understanding this distinction is key to achieving professional-level results. The 110’s design seamlessly transitions between these abrasives, ensuring a consistently sharp and durable edge.

Angle Guides – 15° and 20°

Precision is paramount when sharpening, and the Chef’sChoice 110 delivers this through its adjustable angle guides. These guides ensure consistent contact between the blade and the diamond abrasives, vital for creating a uniform and effective edge.

The 110 offers two primary angle settings: 15° and 20°. A 15° angle is typically favored for Asian-style knives, known for their exceptional sharpness and delicate slicing capabilities. This sharper angle, however, can be more prone to chipping with heavier use.

A 20° angle is more commonly used for European and American-style knives. This angle provides a robust and durable edge, better suited for tasks like chopping and heavier kitchen work. It offers a balance between sharpness and resilience.

Selecting the correct angle is crucial. Refer to your knife manufacturer’s recommendations, or choose based on your typical knife usage. The 110’s easy-to-adjust guides simplify this process, guaranteeing accurate and repeatable results every time.

Stage 1: Coarse Sharpening

The first stage of sharpening with the Chef’sChoice 110 focuses on reshaping the blade’s edge. This is where the coarse diamond abrasives remove metal to correct dullness or damage, establishing a new bevel.

To begin, select the appropriate angle guide (15° or 20°) based on your knife type. Gently insert the blade into the first slot, ensuring the heel and tip make full contact with the diamond abrasives.

Apply light, consistent pressure and draw the blade through the slot, maintaining the selected angle. Repeat this motion 4-6 times per side. Avoid excessive force, allowing the abrasives to do the work.

It’s crucial to use a smooth, controlled motion. You’ll notice metal filings accumulating – this is normal and indicates the sharpening process is working. This stage prepares the blade for the subsequent honing and polishing stages;

Stage 2: Fine Honing

Following coarse sharpening, the second stage utilizes fine diamond abrasives to refine the blade’s edge. This process removes microscopic burrs created during Stage 1 and begins to create a truly sharp, clean edge.

Continue using the same angle guide selected in Stage 1; Insert the blade into the second slot, again ensuring full contact between the heel, tip, and diamond abrasives.

Employ light to moderate pressure and draw the blade through the slot, mirroring the motion from the previous stage. Repeat this 4-6 times per side. The resistance will feel noticeably lighter than in Stage 1.

This stage is about precision, not force. Focus on maintaining the angle and a consistent rhythm. Fine honing dramatically improves sharpness and prepares the blade for the final polishing stage, resulting in a professional-quality edge.

Stage 3: Polishing/Stropping

The final stage employs a specialized polishing/stropping material to achieve maximum sharpness and a refined edge. This stage isn’t about removing metal, but rather aligning the microscopic teeth created during honing, resulting in a smoother, more durable edge.

Utilize the same angle guide as Stages 1 and 2. Gently draw the blade through the third slot, applying very light pressure. This stage requires finesse; avoid forcing the blade.

Repeat this process 4-6 times per side. You’ll notice minimal resistance. The polishing material subtly refines the edge, enhancing its cutting performance and longevity.

This stage is crucial for achieving a truly professional-grade sharpness. It eliminates any remaining micro-burrs and creates a polished, razor-sharp edge ready for any culinary task. Your knife is now optimally prepared!

Preparing to Sharpen Your Knives

Before you begin, identify your knife type and assess its condition. Ensure compatibility with the Chef’sChoice 110 to achieve optimal sharpening results safely.

Knife Types Suitable for the 110

The Chef’sChoice 110 excels at sharpening a wide variety of knives commonly found in a kitchen setting. This includes most high-carbon stainless steel and stainless steel knives. Straight-edge knives are ideally suited for this sharpener, delivering consistently excellent results.

Specifically, it works wonderfully on chef’s knives, paring knives, utility knives, and even boning knives. Serrated or notched blades, however, are not designed for use with this particular model. The 110 is particularly effective on knives with a Rockwell hardness of up to 68 HRC.

It’s important to note that the 110 is designed for standard kitchen knives; specialized blades like ceramic knives or very thick, heavy-duty cleavers are not recommended. Always check your knife’s steel type if you are unsure of its compatibility before attempting to sharpen it.

Knives NOT Recommended for the 110

Certain knife types are not compatible with the Chef’sChoice 110 and attempting to sharpen them could damage both the knife and the sharpener; Primarily, serrated knives – those with a scalloped edge – should never be used with this model. The diamond abrasives are designed for straight edges and will likely ruin the serrations.

Furthermore, ceramic knives are too brittle for the 110’s sharpening process and risk chipping or breaking. Knives with a Rockwell hardness exceeding 68 HRC are also not recommended, as the abrasives may not effectively engage the extremely hard steel.

Avoid using the sharpener on very thick or heavy cleavers, as they may not fit properly within the angle guides. Finally, do not attempt to sharpen any damaged or heavily corroded blades; address these issues before sharpening.

Assessing Your Knife’s Condition

Before sharpening, carefully evaluate your knife’s current state. A simple paper test can reveal a lot: try slicing through a piece of paper – a sharp knife will cut cleanly, while a dull one will tear. Visually inspect the blade for chips, rolls, or significant wear along the cutting edge. These imperfections require attention before using the Chef’sChoice 110.

Determine the existing angle of the blade. While the 110 offers 15° and 20° settings, matching the original angle is ideal. If unsure, start with the 20° setting, commonly used for most kitchen knives.

Consider the level of dullness. A slightly dull knife may only need Stage 2 (honing), while a very dull or damaged knife will require all three stages for complete restoration.

Step-by-Step Sharpening Instructions

Follow these steps to achieve a professional-level sharpness. Begin with Stage 1, progressing through Stages 2 and 3 for optimal results and a polished edge.

Stage 1: Coarse Sharpening – Detailed Procedure

Begin with coarse sharpening to reshape a dull or damaged blade. Ensure the Chef’sChoice 110 is placed on a stable surface. Select the appropriate slot – 15° for Western knives and 20° for Asian knives.

Hold the knife firmly by the handle, maintaining a slight downward pressure. Draw the blade through the slot from heel to tip, using a smooth, consistent motion. Repeat this process 4-6 times on each side of the blade.

It’s crucial to maintain the correct angle throughout each pass. Avoid forcing the blade; let the sharpener do the work. Listen for a consistent sound as the blade engages with the diamond abrasives. This stage removes metal to establish a new edge.

Important: Do not use excessive force, and always sharpen the entire length of the blade. After several passes, check the blade for signs of improvement before proceeding to Stage 2.

Stage 2: Fine Honing – Detailed Procedure

Transition to fine honing after completing Stage 1. This refines the edge created during coarse sharpening, removing burrs and creating a sharper, more polished surface. Use the same angle selection (15° or 20°) as in Stage 1.

Again, hold the knife firmly and draw it through the designated slot, heel to tip, with moderate, consistent pressure. Repeat this process 4-6 times per side. The sound will be noticeably different – smoother and quieter – indicating finer abrasion.

Focus on maintaining a consistent angle and smooth motion. This stage is about refinement, not material removal. Inspect the blade frequently to assess the progress of the honing process.

Remember: Gentle pressure is key. Avoid forcing the blade. This stage prepares the edge for the final polishing step, maximizing sharpness and durability.

Stage 3: Polishing/Stropping – Detailed Procedure

Finalize the sharpening process with Stage 3, polishing and stropping. This stage elevates the edge to its peak sharpness, removing any remaining microscopic burrs and creating a mirror-like finish. Maintain the previously selected angle (15° or 20°).

Draw the knife through the final slot, using very light pressure, heel to tip. Repeat this motion 4-6 times per side. The action should be incredibly smooth and almost silent. This isn’t about removing metal, but aligning the microscopic teeth of the blade.

Important: Minimal pressure is crucial here. Excessive force can actually dull the edge. Inspect the blade carefully; you should notice a refined, gleaming edge.

This final step enhances the edge’s longevity and slicing performance, resulting in a truly professional-quality sharpness. Your knife is now ready for use!

Maintaining Your Chef’sChoice 110

Keep your sharpener performing optimally through regular cleaning and timely abrasive replacements. This ensures consistent, reliable sharpening for years to come.

Proper maintenance extends the life of your unit and preserves the quality of your knife edges.

Cleaning the Sharpener

Regular cleaning is crucial for maintaining the performance and longevity of your Chef’sChoice 110. After each use, or at least weekly with frequent sharpening, unplug the unit and allow it to cool completely. Never immerse the sharpener in water or any other liquid.

Use a soft, slightly damp cloth to wipe down the exterior of the unit, removing any metal filings or debris. Pay particular attention to the slot openings where filings accumulate. A small brush, like a toothbrush, can be helpful for dislodging stubborn particles.

For the diamond abrasives themselves, avoid using abrasive cleaners or scouring pads, as these can damage the diamond surface. Simply wipe them gently with a damp cloth. Ensure the unit is completely dry before storing or using it again. Proper cleaning prevents buildup that can affect sharpening accuracy and efficiency, keeping your knives consistently sharp.

Consistent care equals consistent results!

Replacing Diamond Abrasives

Over time, the diamond abrasives in your Chef’sChoice 110 will wear down with use, diminishing sharpening performance. Replacement is straightforward, ensuring continued optimal results. First, always unplug the unit before attempting any maintenance. Locate the retaining screws securing the diamond abrasives – these are typically on the sides of each stage.

Using a screwdriver, carefully remove the screws and lift out the old abrasive. Align the new abrasive, ensuring it sits flush within the stage. Reinstall the screws, tightening them securely but not over-tightening. Chef’sChoice recommends using only genuine replacement abrasives for consistent quality and fit.

Replacement frequency depends on usage; heavy use requires more frequent changes. Signs it’s time to replace include noticeably longer sharpening times or a less refined edge. Maintaining fresh abrasives guarantees your knives remain exceptionally sharp.

Genuine parts ensure peak performance!

Diamond Abrasive Lifespan

The lifespan of your Chef’sChoice 110’s diamond abrasives varies significantly based on usage frequency and the condition of the knives being sharpened. Sharpening very dull or damaged blades will naturally wear them down faster. Generally, the coarse stage abrasives will wear out before the fine or polishing stages.

As a guideline, a home cook sharpening knives a few times a month can expect coarse abrasives to last approximately one to two years. Frequent professional use or sharpening extremely hard steel may reduce this to several months. Monitor sharpening times; if it takes considerably longer to achieve the same results, it’s time for replacement.

Regular cleaning (see maintenance section) can help prolong abrasive life by removing metal particles. Remember, maintaining sharp abrasives is crucial for achieving consistently sharp knives. Don’t wait for complete wear-out – proactive replacement ensures optimal performance.

Consistent sharpness relies on quality abrasives!

Troubleshooting Common Issues

Encountering problems? This section addresses frequent concerns like ineffective sharpening, uneven edges, or blade scratches. We’ll provide solutions to restore peak performance quickly.

Resolve issues and keep your knives razor-sharp with our easy-to-follow troubleshooting guidance.

Knife Not Sharpening

Problem: If your knife isn’t sharpening effectively with the Chef’sChoice 110, several factors could be at play. First, ensure the diamond abrasives are properly seated and not worn down excessively. Check for any debris lodged within the sharpening stages, as this can impede the process.

Solution: Begin by cleaning the sharpener thoroughly, removing any metal filings or residue. Next, verify you’re applying consistent, gentle pressure and drawing the blade through each stage with a smooth, controlled motion. Avoid forcing the knife; let the abrasives do the work.

Important: Confirm you’re using the correct sharpening angle (15° or 20°) for your knife type. Incorrect angles will prevent a sharp edge from forming. If the issue persists, consider replacing the diamond abrasives, especially if they appear dull or damaged. Finally, double-check that the knife blade is making full contact with the diamond wheels during each pass.

Tip: For extremely dull knives, you may need to repeat the coarse sharpening stage (Stage 1) several times before proceeding to the finer stages.

Uneven Sharpening

Problem: Experiencing uneven sharpening with your Chef’sChoice 110 often indicates inconsistent technique. One side of the blade may be sharper than the other, resulting in a less-than-ideal cutting performance. This is a common issue, but easily addressed with attention to detail.

Solution: The key is maintaining a consistent angle throughout each stroke. Ensure you’re drawing the knife through each stage with equal pressure and speed on both sides. Count your strokes – use the same number of passes on each side of the blade for every stage.

Important: Pay close attention to how you’re holding the knife. A slight tilt or wobble can cause uneven sharpening. Practice maintaining a firm, stable grip and a consistent vertical alignment. If unevenness persists, try slowing down your sharpening speed and focusing on precise movements.

Tip: Regularly inspect the blade’s edge during the process to identify any areas that require additional attention.

Scratches on the Blade

Concern: Noticing scratches appearing on your knife blade while using the Chef’sChoice 110 is understandable, but often not detrimental; The diamond abrasives are designed to remove material, and some surface marking is normal, especially on softer steel blades.

Explanation: These scratches are typically very fine and don’t affect the knife’s performance. However, excessive scratching could indicate applying too much pressure or using a contaminated sharpening stage.

Prevention: Avoid excessive force when drawing the knife through the slots. Let the sharpener do the work. Regularly clean the diamond abrasives with a soft brush to remove metal filings and debris. Using a light lubricating oil (specifically designed for knife sharpening) can also minimize friction and scratching.

Safety Precautions

Always handle knives with extreme care. Never place hands in the path of the blade during sharpening. Ensure a stable surface for operation.

Disconnect the sharpener when cleaning. Keep out of reach of children. Read all instructions before use.

Handling Sharp Knives

Sharp knives are essential for efficient and safe food preparation, but they demand respect and careful handling. Before even thinking about sharpening, understand the inherent risks. Always maintain a firm grip on the knife handle, keeping your fingers positioned safely behind the blade’s edge. Never attempt to catch a falling knife; let it drop and move your feet out of the way.

When presenting the blade to the Chef’sChoice 110, use a slow and deliberate motion. Avoid rushing, as this increases the chance of slips. Focus intently on the task at hand, minimizing distractions. Remember that even a slightly dull knife is still sharp enough to cause injury.

After sharpening, test the blade’s sharpness with caution – a simple paper test is recommended. Never run your finger along the blade’s edge to check sharpness. Store knives securely in a block, sheath, or drawer with blade guards to prevent accidental cuts. Prioritize safety at every stage!

Proper Usage of the Sharpener

The Chef’sChoice 110 is designed for simplicity, but correct usage is crucial for optimal results and longevity of both your knives and the sharpener. Ensure the unit is placed on a stable, non-slip surface before beginning. Always use light, consistent pressure when drawing the blade through each stage – let the diamond abrasives do the work, don’t force it.

Maintain the recommended angles (15° or 20°) as indicated by the guides. A consistent angle is key to achieving a uniform, sharp edge. Draw the blade heel to tip, maintaining contact with the diamond abrasives throughout the entire stroke. Avoid twisting or rocking the knife during the process.

Follow the three-stage process sequentially: coarse, fine, and polishing; Clean the sharpener after each use to remove metal filings. Never disassemble the unit for cleaning or maintenance beyond wiping the exterior.

kodo yocan battery instructions

Yocan Kodo Battery Instructions: A Comprehensive Guide

The Yocan Kodo Pro is a stylish and functional vape battery‚ blending aesthetics with modern technology․ It’s designed for convenient cartridge use‚ offering variable voltage settings and preheating options․

This guide provides detailed kodo yocan battery instructions‚ covering operation‚ maintenance‚ and troubleshooting for both standard and Pro models‚ ensuring optimal performance․

The Yocan Kodo Battery has quickly become a popular choice among vape enthusiasts‚ recognized for its sleek design and reliable performance․ This device is specifically engineered for use with 510-threaded cartridges‚ offering a versatile vaping experience․ The Kodo series‚ including the standard Kodo and the advanced Kodo Pro‚ caters to a wide range of user preferences․

What sets the Yocan Kodo apart is its focus on simplicity and user-friendliness․ It’s designed to be intuitive‚ even for those new to vaping․ The battery’s compact size makes it highly portable‚ easily fitting into a pocket or bag․ Beyond portability‚ the Kodo boasts adjustable voltage settings‚ allowing users to customize their vaping experience to achieve their desired vapor production and flavor intensity․

This comprehensive guide will delve into all aspects of the Yocan Kodo battery‚ from its key features and operation to maintenance and troubleshooting․ Whether you’re a seasoned vaper or just starting out‚ this resource will equip you with the knowledge to maximize your enjoyment of this innovative device․ Understanding its capabilities ensures a safe and satisfying vaping session․

Understanding the Yocan Kodo Pro

The Yocan Kodo Pro represents an evolution of the original Kodo‚ building upon its strengths with enhanced features and functionality․ While maintaining the sleek aesthetic of its predecessor‚ the Pro version introduces significant improvements designed to elevate the vaping experience․ A key upgrade is the inclusion of a digital display screen‚ providing users with precise control and real-time information regarding voltage settings and battery life․

The Kodo Pro also boasts a more powerful battery capacity‚ allowing for extended vaping sessions before requiring a recharge․ This is particularly beneficial for users who are on the go or prefer longer uninterrupted vaping․ Furthermore‚ the Pro model incorporates advanced preheating functionality‚ ensuring consistent vapor production even with thicker oils․ This feature is crucial for optimizing flavor and preventing dry hits․

Compared to the standard Kodo‚ the Pro offers a more refined and customizable experience․ The digital interface and expanded features make it ideal for users who appreciate precision and control․ It remains user-friendly‚ however‚ retaining the simple operation that made the original Kodo so popular․

Key Features of the Yocan Kodo Battery

The Yocan Kodo Battery distinguishes itself through a combination of portability‚ ease of use‚ and versatile functionality․ Its compact size makes it incredibly discreet and convenient for on-the-go vaping‚ easily fitting into a pocket or bag․ A standout feature is the variable voltage control‚ allowing users to customize their vaping experience to suit their preferences and the specific cartridge being used․

The Kodo also incorporates a magnetic connection for effortless cartridge attachment and detachment‚ eliminating the need for threading or complicated procedures․ This magnetic connection ensures a secure and reliable connection‚ preventing accidental disconnections․ The device’s intuitive single-button operation simplifies usage‚ making it accessible to both beginners and experienced vapers․

Furthermore‚ the Kodo boasts a preheating function‚ vital for ensuring consistent vapor production‚ especially with thicker oils․ This prevents dry hits and maximizes flavor extraction․ Its sleek and modern design adds to its appeal‚ making it a stylish accessory alongside its practical benefits․

Battery Capacity and Voltage Settings

The Yocan Kodo Battery typically features a battery capacity ranging from 350mAh to 650mAh‚ depending on the model (standard vs․ Pro)․ This capacity provides ample power for extended vaping sessions‚ though actual battery life will vary based on usage frequency and voltage settings․ The Kodo Pro generally offers a larger capacity for prolonged use․

Regarding voltage settings‚ the Kodo allows for customization to tailor the vaping experience․ Most models offer three to four adjustable voltage levels‚ typically ranging from 2․8V to 4․2V․ Lower voltages are ideal for flavor preservation‚ while higher voltages produce larger vapor clouds and a more intense experience․

Adjusting the voltage is usually achieved through a series of quick clicks of the power button․ The device’s LED indicator will display the selected voltage level․ Understanding these settings is crucial for optimizing performance and achieving the desired vapor quality․ Experimentation is encouraged to find the optimal voltage for each cartridge․

Charging the Yocan Kodo Battery

Charging the Yocan Kodo Battery is a straightforward process‚ typically utilizing a standard Micro-USB cable (USB-C for the Pro version)․ Locate the charging port‚ usually found at the bottom of the device‚ and connect the cable to a powered USB source – a wall adapter or computer USB port will suffice․

During charging‚ the LED indicator light will illuminate‚ often displaying a pulsing color (red or white) to signify that the battery is receiving power․ Once fully charged‚ the indicator light will typically change to a solid color (green or white)‚ indicating completion․

Avoid overcharging the battery‚ as this can potentially reduce its lifespan․ Disconnect the device once fully charged․ A full charge typically takes between 1 to 2 hours‚ depending on the battery capacity and the power of the USB source․ Using a 5V/1A adapter is recommended for optimal charging speed and safety․

LED Indicator Lights and Their Meanings

The Yocan Kodo Battery utilizes an LED indicator light system to communicate its status․ Understanding these signals is crucial for proper operation․ Typically‚ a pulsing red light indicates a low battery level‚ prompting you to recharge the device․

While charging‚ a pulsing white or red light signifies that the battery is actively receiving power․ Once fully charged‚ the light will usually turn to a solid white or green‚ confirming completion․

During vaping‚ the LED may briefly illuminate with each draw․ Some models feature color-coded voltage indicators; for example‚ blue might represent low voltage‚ green medium‚ and red high․ The Yocan Kodo Pro may offer more detailed LED feedback‚ including preheating status․ Refer to your specific model’s documentation for precise interpretations of the LED signals․

Powering On and Off the Device

Powering on your Yocan Kodo Battery is typically achieved with a quick five-click sequence of the power button․ This rapid succession of clicks activates the device‚ and the LED indicator will illuminate to confirm it’s operational․ The device is designed with this safety feature to prevent accidental activation while stored or transported․

To power off the Kodo‚ repeat the same five-click process․ This will deactivate the battery‚ conserving power and preventing unintended use․ A brief visual cue‚ such as the LED turning off‚ will indicate successful deactivation․

It’s important to note that some Yocan Kodo Pro models might have slightly different activation procedures‚ potentially involving holding the power button for a specific duration․ Always consult the user manual specific to your model for the most accurate instructions․ Ensuring proper power cycling extends battery life and enhances overall device safety․

Attaching and Detaching Cartridges

Attaching a cartridge to your Yocan Kodo Battery is a straightforward process․ Locate the 510 threading on the battery’s top․ Carefully align the cartridge’s 510 connector with the battery’s threading and gently screw the cartridge clockwise until it’s securely fastened․ Avoid over-tightening‚ as this could potentially damage the threading on either the battery or the cartridge․

Detaching a cartridge requires reversing this process․ Gently unscrew the cartridge counter-clockwise․ If the cartridge feels stuck‚ avoid excessive force․ A slight rocking motion while unscrewing can help loosen it․ Ensure the battery is powered off before attempting to detach a cartridge for added safety․

Regularly inspect the 510 connection points for cleanliness․ Debris can interfere with a secure connection․ A clean connection ensures optimal performance and prevents issues like inconsistent vapor production․ Proper attachment and detachment preserve the longevity of both your battery and cartridges․

Adjusting Voltage Levels

The Yocan Kodo Battery offers adjustable voltage settings‚ allowing you to customize your vaping experience․ This feature is crucial for optimizing flavor and vapor production based on your cartridge’s contents and personal preference․ Typically‚ the Kodo Pro features three to four voltage levels‚ accessible via a quick button sequence․

To adjust the voltage‚ rapidly click the power button five times․ The LED indicator will then cycle through the available voltage options․ Each subsequent click will increment to the next voltage level․ Refer to the Yocan Kodo battery instructions for specific voltage outputs corresponding to each LED color․

Lower voltages generally provide more subtle flavor‚ while higher voltages deliver larger vapor clouds․ Experiment to find the setting that best suits your needs․ Remember that different cartridges may perform optimally at different voltages․ Start with a lower setting and gradually increase it until you achieve your desired results․

Preheating Functionality

The Yocan Kodo Battery‚ particularly the Pro version‚ incorporates a preheating function designed to ensure consistent vaporization‚ especially with thicker oils․ This feature warms the cartridge before full operation‚ preventing initial dry hits and maximizing flavor extraction․ Preheating is especially useful in colder temperatures where oil viscosity increases․

To activate the preheating function‚ typically you’ll need to rapidly click the power button twice․ This will initiate a brief warming cycle‚ indicated by a specific LED flash pattern as detailed in the Yocan Kodo battery instructions․ The preheat duration is usually a few seconds‚ sufficient to prepare the oil for optimal vaporization․

After preheating‚ simply press and hold the power button to begin vaping as usual․ Utilizing the preheat function can significantly improve the overall vaping experience‚ delivering smoother‚ more flavorful hits․ It’s a valuable tool for users who encounter issues with initial draw resistance or inconsistent vapor production․

Safety Features of the Yocan Kodo

The Yocan Kodo Battery is engineered with several safety features to protect both the device and the user․ A crucial element is short-circuit protection‚ which immediately cuts power in the event of a short‚ preventing overheating and potential hazards․ Overcharge protection safeguards the battery from damage caused by prolonged charging‚ extending its lifespan and ensuring safe operation․

Furthermore‚ the device incorporates over-discharge protection‚ preventing the battery from being drained too low‚ which can also lead to damage․ A 10-second cutoff feature automatically stops power delivery after continuous use‚ mitigating the risk of accidental activation and overheating․ These features are standard in the Yocan Kodo battery instructions․

It’s important to only use the provided charging cable and avoid exposing the battery to extreme temperatures or moisture․ Following these guidelines‚ alongside the built-in safety mechanisms‚ will ensure a safe and enjoyable vaping experience․

Troubleshooting Common Issues

If your Yocan Kodo isn’t powering on‚ first ensure it’s adequately charged․ A common issue is a loose cartridge connection; try re-attaching it securely․ If the LED isn’t illuminating during charging‚ test with a different USB cable and power adapter․ For inconsistent voltage output‚ clean the battery contacts with a cotton swab dipped in isopropyl alcohol – refer to Yocan Kodo battery instructions for cleaning guidance․

If you experience a “no atomization” error‚ verify the cartridge contains sufficient oil and that the coil isn’t burnt out․ A preheat function may help prime the coil․ If the device overheats‚ immediately discontinue use and allow it to cool down before attempting to recharge․

Should issues persist‚ consult the Yocan website for further support or contact their customer service․ Avoid disassembling the device‚ as this will void the warranty and could pose a safety risk․

Cleaning and Maintenance

Regular cleaning and maintenance are crucial for optimal Yocan Kodo performance․ Begin by powering off the device and detaching the cartridge․ Use a cotton swab lightly dampened with isopropyl alcohol to gently clean the battery’s 510 connection thread․ This removes oil residue and ensures a secure connection․

Avoid getting liquid inside the battery․ For the exterior‚ wipe down the device with a soft‚ dry cloth․ Do not submerge the battery in any liquid or use abrasive cleaners․ Inspect the charging port for debris and carefully remove any obstructions with a dry‚ soft brush․

Periodically check the battery for any signs of damage‚ such as cracks or leaks․ If damage is detected‚ discontinue use immediately․ Following these simple Yocan Kodo battery instructions will prolong the life of your device and maintain consistent vapor production․

Yocan Kodo Pro vs․ Standard Kodo

The Yocan Kodo Pro represents an upgrade over the standard Yocan Kodo‚ offering several key enhancements․ Primarily‚ the Pro version boasts a larger battery capacity‚ providing extended usage time between charges․ It also features a more refined and durable construction‚ enhancing its overall feel and longevity․

A significant difference lies in the voltage adjustment capabilities․ While both models offer variable voltage‚ the Pro version typically provides a wider range of settings‚ allowing for greater customization of the vaping experience․ The Pro also often includes advanced features like a digital display showing voltage levels and battery life․

In essence‚ the standard Kodo is a reliable and compact option‚ while the Pro version caters to users seeking increased power‚ customization‚ and a more premium build quality․ Following these Yocan Kodo battery instructions will help you choose the best model for your needs․

Cartridge Compatibility

The Yocan Kodo battery is specifically designed to be compatible with 510-threaded cartridges‚ which is the industry standard for most vape oil cartridges․ This broad compatibility means users have a wide selection of oils and concentrates to choose from‚ offering flexibility and convenience․

However‚ it’s crucial to ensure the cartridge’s 510 connection is clean and free of debris for a secure and reliable connection․ Improperly seated cartridges can lead to leaking or inconsistent performance․ Following these Yocan Kodo battery instructions regarding cartridge attachment is vital․

While generally compatible with most 510 cartridges‚ some exceptionally large or uniquely designed cartridges might not fit perfectly․ It’s always recommended to check cartridge dimensions if you’re unsure; The Yocan Kodo Pro maintains the same 510 compatibility‚ ensuring a consistent experience across both models․

Understanding Preheat Modes

The Yocan Kodo and Yocan Kodo Pro feature preheat functionality‚ a crucial element for optimizing the vaping experience‚ especially with thicker oils․ These Yocan Kodo battery instructions highlight the importance of preheating․ By quickly warming the oil‚ preheat modes ensure consistent vaporization and prevent harsh hits․

Typically‚ the Kodo offers multiple preheat settings‚ activated by rapidly clicking the power button five times․ These settings deliver short bursts of heat‚ preparing the oil for optimal performance․ The Yocan Kodo Pro often expands on this‚ offering more customizable preheat options and durations․

Utilizing preheat is particularly beneficial for concentrates with high viscosity․ Without it‚ these oils may not vaporize efficiently‚ leading to wasted product and a subpar experience․ Following these kodo yocan battery instructions regarding preheating will significantly improve your vaping sessions․

Battery Life Expectancy

Understanding the Yocan Kodo battery life expectancy is vital for consistent use․ These Yocan Kodo battery instructions detail factors influencing longevity․ The Kodo typically houses a 350mAh battery‚ while the Yocan Kodo Pro boasts a larger 650mAh capacity‚ directly impacting usage time․

Actual battery life varies significantly based on voltage settings‚ preheating frequency‚ and vaping habits․ Higher voltage settings and frequent preheating consume more power‚ reducing overall runtime․ A moderate user‚ employing mid-range voltage and occasional preheating‚ can generally expect several hours of use from a full charge․

Over time‚ like all rechargeable batteries‚ the Kodo’s capacity will naturally degrade․ Proper storage and charging practices‚ as outlined in these kodo yocan battery instructions‚ can help maximize its lifespan․ Expect a gradual decrease in performance after approximately 6-12 months of regular use․

Proper Storage of the Yocan Kodo Battery

Following these Yocan Kodo battery instructions for proper storage is crucial for maintaining battery health and safety․ When not in use for extended periods‚ fully discharge the battery to approximately 30-50% capacity․ Avoid storing a fully charged or completely depleted Yocan Kodo battery․

Store the device in a cool‚ dry place‚ away from direct sunlight‚ extreme temperatures‚ and humidity․ These conditions can accelerate battery degradation․ It’s best to keep the battery in a non-conductive container‚ such as its original packaging or a plastic case‚ to prevent accidental short circuits․

Keep the battery out of reach of children and pets․ Avoid storing the Yocan Kodo alongside metallic objects‚ as this could also lead to short-circuiting․ Adhering to these kodo yocan battery instructions will significantly extend the battery’s lifespan and ensure safe operation when you’re ready to vape again․

Warranty Information

Yocan offers a limited warranty on the Kodo battery‚ protecting against manufacturer defects․ This warranty typically covers defects in materials and workmanship under normal use conditions․ It’s essential to retain your proof of purchase‚ as it’s required for any warranty claim related to these kodo yocan battery instructions․

The warranty period varies‚ but generally‚ it’s 90 days from the date of purchase․ The warranty does not cover damage caused by misuse‚ abuse‚ accidents‚ unauthorized modifications‚ or normal wear and tear․ This includes damage from dropping the device‚ liquid ingress‚ or improper charging practices․

To initiate a warranty claim‚ contact Yocan’s customer support with your proof of purchase and a detailed description of the defect․ They will provide instructions on how to return the device for inspection․ Following these kodo yocan battery instructions regarding warranty claims ensures a smooth process․

Frequently Asked Questions (FAQ)

Q: What does the light mean when it flashes three times? A: Three flashes typically indicate a low battery level‚ prompting you to recharge following these kodo yocan battery instructions․

Q: Can I use any cartridge with the Yocan Kodo? A: The Kodo is designed for 510-threaded cartridges․ Ensure compatibility before attaching․

Q: How do I adjust the voltage? A: Use the power button to cycle through the available voltage settings․ Refer to the voltage settings section of these kodo yocan battery instructions for details․

Q: What if my Kodo isn’t charging? A: Ensure the charging cable is securely connected and the power source is functioning․ Try a different USB cable and adapter․

Q: How do I clean my Yocan Kodo? A: Gently wipe the battery contacts with a cotton swab dipped in isopropyl alcohol․ Avoid getting liquid inside the device․ These kodo yocan battery instructions emphasize proper cleaning․

Where to Purchase Replacement Parts

Finding replacement parts for your Yocan Kodo battery is crucial for maintaining its functionality․ Official Yocan retailers‚ both online and brick-and-mortar stores‚ are the most reliable sources․ Websites like the official Yocan website (yocan․com) frequently stock replacement batteries‚ charging cables‚ and occasionally‚ even battery housings․

Authorized vape shops often carry Yocan products and can assist you in finding the specific parts you need‚ adhering to these kodo yocan battery instructions for component compatibility․ Be cautious when purchasing from third-party marketplaces‚ as counterfeit products are a concern․

Always verify the authenticity of the seller and the product before making a purchase․ When seeking replacement parts‚ have your Kodo model (standard or Pro) readily available to ensure you order the correct components․ Following these kodo yocan battery instructions will help you find genuine parts․

babysitter instructions template

Babysitter Instructions Template: Comprehensive Guide

This comprehensive guide helps parents create detailed instructions for their babysitters․ Ensure every essential detail about your child’s care and household routines is clearly communicated‚ fostering a smooth and reassuring experience for everyone involved․ It aims for clarity․

Parent/Guardian Emergency Contacts

Ensuring immediate access to parent or guardian contact information is paramount for any babysitter․ This critical section of your babysitter instructions template should clearly list primary phone numbers where parents can be reached at all times while away․ Include both cell phone numbers for direct calls and‚ if applicable‚ work numbers or landlines for alternative communication channels․ It is essential to specify the names corresponding to each number to avoid any confusion during an urgent situation․ Consider adding a note about the best method of contact (e․g․‚ text first‚ then call)․ This section forms the backbone of communication‚ enabling the caregiver to promptly address any concerns or emergencies that may arise during their time with your children․ A well-prepared contact sheet‚ often part of a consent form‚ empowers the babysitter to act confidently‚ knowing they can connect with you directly․ Always keep this information updated‚ especially before each sitting‚ to guarantee its accuracy and effectiveness․ Providing these details upfront is a fundamental step in establishing a safe and secure environment for your children‚ offering peace of mind to both the parents and the caregiver․ It’s a vital component of any comprehensive babysitter information sheet‚ ensuring clear communication pathways are established from the outset․

Alternative Emergency Contacts

Beyond the primary parent or guardian contacts‚ it is absolutely crucial to provide a list of alternative emergency contacts․ These individuals serve as a vital backup in scenarios where parents are unreachable‚ ensuring that immediate assistance or decision-making can still occur․ This section should clearly include names‚ relationships to the child‚ and reliable phone numbers for at least two trusted individuals․ Common choices include close relatives such as grandparents‚ aunts‚ or uncles‚ as well as trusted neighbors or very close family friends who are aware of the situation and willing to be contacted․ It’s beneficial to prioritize these contacts‚ indicating who should be called first if the primary parent contacts are unresponsive․ Ensure that all listed alternative contacts are fully informed that they are on this list and have consented to be contacted in an emergency․ Their proximity to your home‚ and their ability to quickly respond or provide guidance‚ can be an important factor․ This foresight ensures that your babysitter has a comprehensive network of support to rely on‚ preventing potential delays in critical situations and providing an extra layer of security for your children․ Having multiple backup options significantly enhances the safety protocols‚ offering greater peace of mind for everyone involved during your absence․

Medical Consent Form Details

A crucial component of any comprehensive babysitter instructions template is a detailed medical consent form․ This document empowers the caregiver to seek necessary medical attention for your child in an emergency‚ particularly if you are unreachable․ It is essential to include the child’s full name‚ date of birth‚ and any known medical conditions or allergies‚ along with their severity․ The form should clearly state your preferred medical facility or pediatrician‚ including their contact information․ Furthermore‚ it’s vital to provide details of your health insurance policy‚ including the company name‚ policy number‚ and subscriber information‚ to facilitate any required medical services․ The form explicitly grants the babysitter permission to authorize emergency medical treatment‚ including diagnostic procedures‚ medication administration‚ and hospitalization‚ if deemed necessary by a medical professional․ Parents or legal guardians must sign and date this consent form‚ ensuring its legal validity․ This proactive measure provides peace of mind‚ knowing that your child will receive prompt and appropriate care should an unforeseen medical situation arise‚ making it an indispensable part of your babysitter’s information packet․

Child-Specific Routines

This section details your child’s unique routines․ Specify daily nap schedules‚ effective comforting strategies‚ and favorite items․ Include screen time rules and any specific unique habits‚ ensuring a consistent and familiar environment for their comfort․

Daily Nap Schedules

Adhering to the child’s daily nap schedule is crucial for well-being and routine consistency․ Prioritize these times for adequate rest‚ directly impacting mood and behavior․ For [Child’s Name]‚ naps are typically from [Start Time] to [End Time]․

The pre-nap routine is vital for smooth transition․ This includes a calming activity‚ like reading a book․ Observe specific tiredness cues‚ such as [e․g․‚ rubbing eyes]․ As parents note‚ children have distinct rituals; for example‚ one “likes to climb the stairs to go to his room and take a nap․” Follow these habits․ Ensure the sleep environment is [e․g․‚ dark‚ quiet‚ comfortable]․

If your child resists napping‚ offer gentle reassurance or quiet comfort; avoid overstimulation․ Do not introduce stimulating activities before naps․ Should they wake early‚ allow moments for self-settling․ If fully awake‚ engage in calm‚ independent play․ Consistency is key․

Comforting Strategies and Favorite Items

Understanding [Child’s Name]’s preferred comforting strategies and cherished items is essential for a smooth and happy experience․ When needing soothing‚ especially during distress or transition‚ employing specific methods makes a significant difference․ Their primary comfort item is [e․g․‚ a blue blanket‚ specific teddy bear]‚ often referred to as [Item’s Name]․ Please ensure this item is readily accessible‚ as its presence provides immediate reassurance and security․

Should [Child’s Name] become upset‚ certain techniques are particularly effective․ Gentle rocking while singing a soft lullaby‚ or reading their favorite storybook‚ [Book Title]‚ often helps de-escalate tears․ As parents note‚ “tricks to get him to calm down” are invaluable․ If their primary toy‚ like “Mickey Mouse‚” isn’t effective‚ “then a rattle if he is tired of Mickey” might be the next best option․ This tiered approach to comfort is very helpful․ Always maintain a calm‚ reassuring demeanor‚ offering verbal comfort and a gentle touch․

Avoid harsh tones or abrupt movements․ Redirect attention with a preferred activity once they calm․ Knowing these details greatly assists maintaining a peaceful environment․

Screen Time Rules

Strict screen time rules are crucial for [Child’s Name]’s routine; we are “really particular” about these preferences․ Your diligent adherence to these guidelines is absolutely essential․

Screen time is capped at [X minutes/hours] per day‚ covering all devices: tablets‚ television‚ and smartphones․ Only pre-approved educational content or specific applications are permitted․ Acceptable options are listed [specify location]․ Absolutely no violent‚ adult-oriented‚ or unapproved games/videos are allowed; content must be age-appropriate․

Screen time occurs only after [specific activities‚ e․g․‚ outdoor play‚ reading‚ tidying] are completed․ It must not be a primary comforting tool or used to bypass responsibilities․ If [Child’s Name] requests more screen time or attempts unauthorized access‚ firmly but gently explain the rules․ Redirect to engaging alternatives: creative play‚ board games‚ or drawing․ Your consistent enforcement of boundaries is vital for maintaining routine and understanding expectations․ Thank you for upholding these important preferences․

Feeding and Nutrition

This section outlines vital feeding and nutrition details․ It covers specific meal times‚ food amounts‚ proper bottle warming‚ and crucial information on any food allergies or dietary restrictions․ Your adherence ensures a healthy and safe eating experience for the child․

Meal and Snack Times

Strict adherence to the child’s established feeding schedule is critical for their routine and nutritional needs․ Clearly outlined designated times for breakfast‚ lunch‚ dinner‚ and approved snacks must be followed precisely․ For infants‚ precise bottle feeding intervals are paramount for proper digestion and well-being; respect these timings diligently; Ensure all meal and snack times‚ including specifics like a 12:30 PM lunch or 3:15 PM afternoon snack‚ are observed without deviation․ Offer favorite snacks‚ such as specific fruits‚ crackers‚ or yogurt‚ only as per the provided schedule and the child’s known preferences․ Prevent snacks too close to main meals‚ allowing a healthy appetite for larger portions․ Parents often have particular instructions regarding food and milk quantities; pay close attention to specified portion sizes for every item․ Document any unusual hunger or refusal to eat‚ reporting this detailed observation upon return․ Your careful consistency in following these meal and snack guidelines is absolutely vital for the child’s continued routine and overall well-being during your care․

Specific Food Amounts and Additives

Parents often have very precise instructions regarding the exact quantities of food and milk their children consume‚ which are crucial for their dietary needs and growth․ It is imperative to adhere strictly to these specified amounts for every meal and snack․ For infants‚ note the exact ounces of formula or breast milk to be given per bottle‚ ensuring no less or more is offered than instructed․ For older children‚ specific portion sizes for solid foods‚ such as “half a cup of pasta” or “one piece of toast‚” must be respected․

Furthermore‚ be aware of any particular additives that parents might include with their child’s food․ This could involve specific vitamins‚ supplements‚ or fortifiers mixed into milk or purees․ Instructions will detail what to add‚ in what quantity‚ and at which meal․ Under no circumstances should any additional ingredients‚ condiments‚ or unauthorized substances be given to the child without explicit parental consent․ Always double-check labels and ensure you are administering the correct amounts of any specified additions to maintain the child’s established nutritional and health regimen․

Bottle Warming Instructions

For proper bottle preparation‚ please locate the bottle warmer‚ typically found in the kitchen․ An instruction manual should also be available in the bottle cabinet if needed for reference‚ though the general steps are straightforward․ When preparing a bottle‚ first retrieve it from the refrigerator․ Gently swirl the bottle to ensure the contents are well mixed before placing it into the warmer․

Activate the warmer according to its specific controls․ It is crucial not to interrupt the warming cycle․ Do not remove the bottle prematurely; wait until the timer has clicked and the warming process is fully completed․ Once the warmer indicates completion‚ carefully remove the bottle․ Swirl the milk again to evenly distribute the heat․ Before offering the bottle to the child‚ always test the temperature․ Dispense a few drops onto your inner wrist‚ preferably over the sink‚ to verify that the milk is comfortably warm and not too hot‚ preventing any risk of scalding․ Safety is paramount when warming bottles․

Food Allergies and Restrictions

It is critically important to be fully aware of any food allergies or dietary restrictions our child may have․ Please review this section carefully before preparing or offering any food or snacks․ Our child has specific allergies to [list specific allergens‚ e․g․‚ peanuts‚ dairy‚ eggs]‚ which can trigger severe reactions․ Under no circumstances should these items‚ or any products containing them‚ be given․

Furthermore‚ please be mindful of any general food restrictions‚ such as [list restrictions‚ e․g․‚ gluten-free diet‚ vegetarian‚ no added sugar]․ Always double-check ingredient labels on packaged foods to ensure compliance․ If you are unsure about any food item‚ please err on the side of caution and do not offer it․ In the event of an accidental exposure or if you observe any signs of an allergic reaction (e․g․‚ hives‚ swelling‚ difficulty breathing)‚ immediately refer to the “Allergy Triggers and Responses” section for emergency protocols and contact information․ Vigilance regarding food safety is paramount to our child’s well-being․

Health and Safety

This section outlines all critical health and safety information for your child․ It includes known medical conditions‚ detailed allergy triggers and responses‚ and specific asthma emergency protocols․ Adhering to these guidelines is paramount for ensuring a safe environment․

Known Medical Conditions

It is crucial for your babysitter to be fully aware of any known medical conditions your child may have‚ ensuring their safety and well-being․ Provide comprehensive details regarding chronic illnesses‚ developmental delays‚ or specific health challenges․ This includes conditions like epilepsy‚ diabetes‚ or other ongoing health issues requiring particular attention or medication․ Clearly outline symptoms to watch for‚ prescribed actions in case of an episode or complication‚ and the location of any necessary medical supplies or emergency medication (excluding allergy or asthma related items)․ For instance‚ if your child has diabetes‚ specify insulin administration‚ blood sugar monitoring frequency‚ and what to do for low or high blood sugar․ If prone to seizures‚ describe the type‚ typical duration‚ and appropriate first aid steps․ Additionally‚ inform the sitter about any daily medications‚ their exact dosages‚ and precise administration times․ Include instructions on administering liquid medications or using specific medical devices․ Emphasize when to contact you immediately versus when to seek emergency medical attention․ Your thoroughness directly impacts the quality of care and safety provided․

Allergy Triggers and Responses

It is absolutely crucial to inform your babysitter thoroughly about any known allergies your child has‚ specifying all potential triggers and the necessary response protocols․ Common environmental triggers include pollen‚ dust mites‚ and pet dander‚ which can cause symptoms like sneezing‚ runny nose‚ itchy eyes‚ and skin rashes․ Clearly list any non-food allergens your child is sensitive to․ Detail the specific signs of an allergic reaction‚ which can range from mild skin irritations such as hives or redness‚ to more severe symptoms like facial swelling‚ difficulty breathing‚ or wheezing․ It is vital to distinguish between a mild reaction and a potentially life-threatening anaphylactic episode․ Outline the immediate steps to take: first‚ administer any prescribed emergency medication‚ such as an antihistamine or‚ if severe‚ an auto-injector (like an EpiPen)․ Provide explicit instructions on how and when to use these devices‚ ensuring the sitter is confident in their application․ Secondly‚ contact you immediately․ Thirdly‚ if symptoms are severe or worsen rapidly‚ instruct the sitter to call emergency services (911) without delay․ Ensure all emergency medications are easily accessible and clearly labeled․ Knowing these triggers and responses is absolutely paramount for your child’s safety․

Asthma Symptoms and Emergency Protocols

For children with asthma‚ it is critical that your babysitter understands the symptoms and knows how to respond․ Key symptoms to watch for include coughing‚ which can be dry or mucus-filled and often worsens at night or early morning․ Wheezing‚ a whistling or squeaky sound during breathing‚ especially when exhaling‚ is another significant indicator․ Your child might also experience shortness of breath‚ chest tightness‚ or increased mucus production‚ making it difficult to breathe․ An asthma attack is a severe episode where breathing becomes very difficult and can be life-threatening․ Triggers can vary‚ including exercise‚ high levels of air irritants‚ or allergens like pollen and dust mites․ In the event of an asthma attack‚ administer the prescribed reliever inhaler immediately as per the child’s asthma action plan․ Ensure the babysitter knows how to use the inhaler correctly‚ including the use of a spacer if applicable․ If symptoms do not improve after administering the medication‚ or if they worsen rapidly‚ contact you without delay․ If the child shows signs of severe distress or struggles significantly to breathe‚ call emergency services (911) immediately․ All asthma medications and the action plan must be easily accessible and clearly explained to the sitter․

Household & General Guidelines

This section outlines essential household information and general guidelines for the babysitter․ It covers important aspects like pet care‚ house rules‚ and any specific expectations to ensure a smooth and safe environment while you are away․

Pet Care Instructions (if applicable)

Clear pet care instructions are crucial for our furry family members’ comfort and safety․ Ensure the babysitter is fully informed about all pet routines and specific needs for any animals present in the home․ For our dog‚ precise feeding guidelines are vital․ Serve one cup of dry kibble at 7:00 AM and again at 6:00 PM․ Administer any additives‚ such as daily joint supplements‚ as directed with their food․ It is very important to note that chocolate‚ grapes‚ and xylitol are strictly forbidden due to severe health risks․ Walks are scheduled for 8:00 AM and 7:00 PM‚ each lasting approximately twenty-five to thirty minutes․ The leash is by the back door‚ and ensure they are always securely on it during walks․ Only dental chews are permitted for treats‚ with a daily limit of one․ Our dog understands “Sit‚” “Stay‚” and “Come‚” often accompanied by a pointing finger for “Come․” While routine adherence is appreciated‚ minor adjustments are acceptable if beneficial for their overall well-being․ Report any unusual pet behavior or health concerns immediately to the emergency contacts provided‚ without any delay․

Sitter Expectations and House Rules

To ensure a safe and respectful environment‚ we have a few important expectations and house rules for our babysitter․ Firstly‚ absolutely no posting of our child’s images or videos on any social media platforms is permitted․ We prioritize their privacy and safety above all else‚ and this rule is non-negotiable․ Furthermore‚ smoking‚ consuming alcoholic beverages‚ or using any illegal drugs on our property is strictly prohibited at all times․ We expect our home to be a completely drug and alcohol-free zone while you are providing care․ Regarding minor household duties‚ we appreciate light tidying up after the children’s activities and meals․ Please ensure dishes used are either loaded into the dishwasher or rinsed and left neatly by the sink․ If applicable‚ kindly bring in any mail from the mailbox and water the indoor plants‚ as outlined in their specific instructions․ For key management‚ please follow the agreed-upon pick-up and return protocol‚ ensuring the house is securely locked upon your departure․ Maintaining open communication and adhering to these clear guidelines will ensure a positive experience for everyone involved․ Your professionalism and commitment to these rules are highly valued‚ contributing to a trusted and consistent caregiving relationship for our family․

t shirt wash instructions

Properly washing your t-shirts is essential for maintaining their quality and longevity. Simple care practices can prevent fading‚ shrinkage‚ and damage‚ ensuring your tees stay vibrant and comfortable.

Why Proper Washing is Essential for T-Shirts

Proper washing is crucial for maintaining the quality and appearance of t-shirts. Improper techniques can lead to fading‚ shrinkage‚ or fabric wear‚ reducing their lifespan. Washing inside out and using cold water helps preserve colors and prevent pilling. Following care labels ensures fabrics like cotton or blends retain their softness and shape. Over-washing or using harsh detergents can damage materials and cause premature aging. By adopting the right practices‚ you can keep your t-shirts vibrant‚ comfortable‚ and looking their best for years to come.

Understanding Fabric Types and Their Care Requirements

Different fabrics require specific care to maintain their quality. Cotton t-shirts are durable but may shrink in hot water‚ while polyester blends resist shrinkage but can pill. Delicate fabrics like tri-blends need gentle washing to prevent damage. Always check the care label to identify the material and its needs. Using the right detergent and water temperature ensures fabrics retain their softness and shape. Proper care tailored to the fabric type extends the lifespan of your t-shirts and keeps them looking their best.

General Tips for Washing T-Shirts

Turning t-shirts inside out protects designs and prevents fading. Use cold water to avoid shrinkage and color loss. Opt for mild detergents to prevent fabric damage. Avoid overcrowding the washing machine to reduce fabric stress. Gently handle t-shirts to maintain their shape and quality.

Turning T-Shirts Inside Out Before Washing

Turning t-shirts inside out before washing protects the outer fabric from friction and abrasion. This simple step prevents fading‚ pilling‚ and damage to prints or designs. It also reduces lint buildup and keeps colors vibrant. By minimizing direct contact with washing machine agitation‚ the fabric remains softer and less prone to wear. This method is especially crucial for graphic tees or those with sensitive materials. Consistently turning t-shirts inside out ensures they maintain their quality and appearance over time‚ making it a key step in proper care routines.

Importance of Cold Water for Washing T-Shirts

Cold water is essential for washing t-shirts to preserve their quality and appearance. It prevents shrinkage‚ color fading‚ and damage to delicate fabrics. Hot water can cause fibers to break down‚ leading to a worn look and potential shrinkage. Cold water also helps maintain the vibrancy of dyes‚ especially in colored or printed tees. Using cold water is a simple yet effective way to extend the lifespan of your t-shirts while keeping them soft and comfortable. It’s a recommended practice for both machine and hand washing.

Using Mild Detergents for Delicate Fabrics

Mild detergents are crucial for washing delicate t-shirt fabrics to prevent damage and fading. Harsh chemicals can weaken fibers and cause colors to bleed. Opt for phosphate-free‚ gentle detergents designed for delicate or hand-wash cycles. These formulas are less abrasive and help preserve the softness and vibrancy of your tees. Avoid using bleach or heavy-duty cleaners‚ as they can irreparably harm the fabric. Mild detergents ensure a safe and effective clean‚ extending the lifespan of your t-shirts while maintaining their quality and comfort.

Washing Methods

Choose between machine washing and hand washing based on fabric type and care needs. Machine washing is convenient‚ while hand washing is ideal for delicate or printed tees.

Machine Washing: Best Practices

For optimal results‚ turn t-shirts inside out before machine washing to protect designs and prevent pilling. Use cold water‚ ideally at 30°C‚ to avoid shrinkage and color fading. Choose a mild detergent suitable for the fabric type. Select a gentle cycle with a low spin setting to minimize wear. Avoid overloading the machine‚ as this can cause fabric tension and damage. Following these steps ensures your t-shirts remain vibrant and intact after each wash.

Hand Washing: A Gentle Approach for Delicate T-Shirts

Hand washing is ideal for delicate or printed t-shirts to preserve their quality and design. Turn the shirt inside out to protect the exterior. Use cold water and a mild detergent‚ gently agitating the fabric with your hands. Avoid scrubbing or wringing‚ as this can cause stretching or damage. Rinse thoroughly‚ then pat dry with a towel. Do not twist or wring‚ as this can distort the fabric. Air dry by laying flat or hanging to maintain shape and prevent shrinkage.

Drying T-Shirts

Proper drying is crucial for maintaining t-shirt quality. Air drying preserves fabric integrity‚ while tumble drying on low heat prevents shrinkage. Reshape damp shirts and avoid direct sunlight to prevent fading.

Air Drying vs. Tumble Drying: Pros and Cons

Air drying is ideal for preserving fabric integrity and preventing shrinkage‚ while tumble drying on low heat offers convenience but risks damage. Air drying maintains shape and color‚ though it takes longer. Tumble drying is faster but can cause wear if not done gently. Always reshape damp shirts and avoid high heat to protect materials. For delicate or printed tees‚ air drying is recommended to prevent fading and cracking. Balancing convenience and care ensures your t-shirts remain vibrant and durable.

How to Air Dry T-Shirts Properly

Air drying is a gentle method to preserve your t-shirts’ quality. Lay them flat on a clean towel or hang them on a clothesline‚ reshaping while damp to maintain their original shape. Avoid direct sunlight to prevent fading and ensure airflow for even drying. For best results‚ air dry indoors on a drying rack or hanger. This method prevents shrinkage‚ maintains fabric softness‚ and extends the life of your tees. Proper air drying ensures your t-shirts remain vibrant and comfortable for years to come.

Tips for Tumble Drying on Low Heat

Tumble drying on low heat is a safer alternative to high heat‚ which can shrink or damage t-shirts. Always use a low heat setting to prevent fabric stress and color fading. Remove t-shirts as soon as the cycle ends to avoid wrinkles and creases. Avoid overloading the dryer‚ as this can cause excessive wear. For best results‚ tumble dry delicate or printed tees inside out to protect designs. This method balances convenience with care‚ ensuring your t-shirts remain soft and vibrant while maintaining their shape and quality over time.

Stain Removal

Act quickly to treat stains on t-shirts‚ as timely removal prevents permanent damage. Pre-treat spots with mild detergent or stain remover‚ gently agitating before washing to ensure effectiveness.

Common Stains and How to Remove Them

Food‚ drink‚ and sweat stains are common on t-shirts. For food and drink stains‚ blot gently with a clean cloth and pre-treat with mild detergent or stain remover before washing. Sweat stains can be tackled with vinegar or baking soda applied directly to the area. Ink stains may require alcohol or specialized stain-removal products. Always act quickly‚ as fresh stains are easier to remove. Gently agitate the fabric and rinse thoroughly to ensure stains are eliminated before drying.

Removing Food and Drink Stains

Act quickly to remove food and drink stains‚ as fresh stains are easier to treat. Blot the stain gently with a clean cloth to absorb excess liquid. Apply a small amount of mild detergent or stain remover directly to the affected area. Let it sit for a few minutes before rinsing with cold water. Avoid rubbing the stain‚ as this can damage the fabric. Wash the t-shirt as usual in cold water to prevent setting the stain. Repeat if necessary before drying to ensure the stain is completely removed.

Eliminating Sweat Stains

Sweat stains can be challenging‚ but prompt treatment is key to removal. Apply a small amount of mild detergent or stain remover directly to the affected area. Gently rub the fabric to work in the solution. Allow it to sit for 10-15 minutes before washing in cold water. Avoid hot water‚ as it can set the stain permanently. For stubborn stains‚ soak the t-shirt in cold water with a mild detergent for several hours. Repeat the process if the stain remains visible after the first wash. This method helps remove both the stain and odor effectively.

Dealing with Ink Stains

Ink stains require immediate attention to prevent them from setting permanently. Blot the stain gently with a clean cloth to absorb excess ink. Apply an alcohol-based solution‚ such as hairspray or hand sanitizer‚ directly to the stain. Let it sit for 10 minutes before washing. For stubborn stains‚ use a laundry pre-treatment product or mix equal parts water and white vinegar. Wash the t-shirt in cold water using a mild detergent. Repeat the process if the stain remains visible after the first wash. Act quickly‚ as ink stains become harder to remove over time.

Storage and Maintenance

Store t-shirts in a cool‚ dry place to maintain their quality. Fold them neatly or hang to prevent wrinkles. Use breathable fabric storage bags to protect against dust and moisture.

How to Fold T-Shirts for Longevity

Folding t-shirts properly helps maintain their shape and prevents wrinkles. Lay the shirt flat‚ fold the sides to the center‚ and roll from the bottom for a compact shape. For the KonMari method‚ fold into a small rectangle and stand upright in your drawer. Avoid hanging t-shirts‚ as this can stretch the shoulders. Store in a cool‚ dry place‚ away from direct sunlight‚ to preserve fabric quality and color vibrancy. Using breathable storage bags can also protect against dust and moisture.

Best Practices for Storing T-Shirts

Proper storage is key to maintaining the quality of your t-shirts. Store them in a cool‚ dry place away from direct sunlight to prevent fading. Use breathable containers or fabric bags to protect against dust and moisture. Avoid folding or hanging‚ as this can cause stretching or wrinkles. Instead‚ roll t-shirts gently and place them in a drawer. For long-term storage‚ consider using acid-free tissue paper to prevent yellowing. Keep them away from harsh chemicals and pests to ensure they remain fresh and intact for years.

Importance of Care Labels

Care labels provide specific instructions tailored to the fabric and design of your t-shirt. Ignoring them can lead to damage‚ while following them ensures longevity and maintains quality.

Why You Should Always Check the Care Label

Checking the care label ensures you follow specific instructions for your t-shirt’s fabric and design. It helps prevent damage‚ shrinkage‚ or color fading‚ while also maintaining the garment’s quality. Labels provide guidance on washing methods‚ temperature settings‚ and drying techniques. Ignoring these instructions can lead to irreversible damage‚ such as stretched fabrics or faded prints. By adhering to the care label‚ you extend the lifespan of your t-shirt and keep it looking its best. Proper care preserves both comfort and appearance‚ making it a simple yet crucial step in maintaining your wardrobe.

Ironing T-Shirts

Ironing t-shirts requires a gentle touch. Use low heat‚ inside out‚ and avoid direct heat on prints. Damp fabric irons best‚ preventing wrinkles without damage.

How to Iron T-Shirts Without Damaging Them

Ironing t-shirts requires care to avoid damage. Use a low heat setting and iron inside out to protect designs. Avoid direct heat on prints or graphics. For best results‚ iron while the fabric is slightly damp. Place a pressing cloth over delicate areas for extra protection. Never use steam‚ as it can shrink or fade colors. Ironing helps restore shape and smoothness‚ ensuring your t-shirts look their best. Always check the care label for specific instructions.

Washing Frequency

Wash t-shirts after 2-3 wears or when soiled. Over-washing can cause wear and tear. Sweat and stains are key indicators for washing. Always check fabric type and usage.

How Often Should You Wash Your T-Shirts?

Wash t-shirts after 2-3 wears or when visibly soiled or smelly. Sweat and stains are key indicators. Over-washing can cause fabric wear and fading. Always check the care label for specific guidance. For everyday use‚ washing every 2-3 wears is ideal. However‚ if the shirt is worn during intense activities or in hot weather‚ it may need more frequent washing. Proper washing frequency helps maintain quality and comfort while preventing damage from over-cleaning.

Special Care for Specific T-Shirts

Special t-shirts‚ like vintage or designer ones‚ require extra care. Turn them inside out‚ use cold water‚ and mild detergents to preserve their quality and design.

Caring for Vintage or Designer T-Shirts

Vintage and designer t-shirts require extra attention to preserve their unique qualities. Always turn them inside out before washing to protect designs and prevent fading. Use cold water and a mild detergent to avoid damage. Avoid using bleach or harsh chemicals‚ as they can harm the fabric or discolor the material. For stains‚ gently spot-treat with a soft brush or clean cloth. Air drying is recommended to prevent shrinkage and maintain shape. If tumble drying‚ use a low heat setting. Store them folded or hung to maintain their condition and avoid creases.

Common Mistakes to Avoid

Avoid over-washing‚ using hot water‚ and harsh detergents‚ as these can cause fading‚ shrinkage‚ and fabric damage. Over-drying and excessive heat can also harm t-shirts.

Over-Washing and Over-Drying: What to Avoid

Over-washing and over-drying are common mistakes that can damage t-shirts. Frequent washing can lead to fading‚ shrinkage‚ and wear‚ while hot water and high heat cause similar harm. Avoid using harsh detergents and excessive dryer time‚ as these can weaken fabrics and ruin prints. Instead‚ wash t-shirts only when necessary and opt for cold water and air drying to preserve their quality and extend their lifespan. Proper care ensures your tees remain soft‚ vibrant‚ and comfortable for years.

ryobi trimmer instructions

This guide provides essential operating instructions, safety tips, and maintenance advice for your Ryobi Trimmer. Follow these steps to ensure optimal performance and longevity. Dependable and easy-to-use, Ryobi Trimmers are designed for efficient gardening.

Overview of Ryobi Trimmers

Ryobi Trimmers are engineered for dependability, ease of operation, and operator safety, making them a top choice for both DIY enthusiasts and professional landscapers. Known for their rugged design, these trimmers are built to handle various gardening tasks efficiently. Available in different models, including electric and gas-powered options, Ryobi Trimmers offer versatility and reliability. They feature adjustable handles, multiple cutting modes, and durable construction, ensuring adaptability for trimming grass, cutting thick vegetation, and maintaining large outdoor spaces. With eco-friendly usage options and robust performance, Ryobi Trimmers are designed to deliver years of trouble-free service when properly maintained. Their user-friendly design and advanced features make them ideal for achieving professional-grade results in home and garden care.

Importance of Following Manufacturer Guidelines

Importance of Following Manufacturer Guidelines

Adhering to the manufacturer’s guidelines is crucial for the safe and effective operation of your Ryobi Trimmer. The manual provides detailed instructions to ensure optimal performance, prevent accidents, and maintain the tool’s longevity. Ignoring these guidelines can lead to serious injury, damage to the trimmer, or voiding the warranty. Proper assembly, operation, and maintenance procedures are outlined to help you achieve professional-grade results. By following the recommendations, you can minimize risks and maximize efficiency. The manual also includes troubleshooting tips and safety precautions to address common issues. Always refer to the manual before using your Ryobi Trimmer to ensure a safe and productive experience. This comprehensive guide is essential for both DIY enthusiasts and professionals seeking reliable results.

Safety Precautions

Always wear protective gear, including gloves and eyewear, when operating your Ryobi Trimmer. Ensure the area is clear of debris and bystanders. Follow all warning labels and instructions to minimize risks and ensure safe operation.

General Safety Rules

To ensure safe operation of your Ryobi Trimmer, always follow these guidelines: Wear protective gear, including gloves, safety glasses, and long pants. Keep loose clothing and long hair tied back. Clear the work area of debris, children, and pets before starting. Avoid operating the trimmer in wet conditions or near open flames. Never touch electrical components with wet hands. Maintain a firm grip on the handle and avoid overreaching. Keep the trimmer blade or string away from your body and bystanders. Follow all instructions in the manual and use the tool only for its intended purpose. Regularly inspect the trimmer for damage and ensure all parts are securely attached. Proper maintenance and adherence to these rules will help prevent accidents and ensure safe, effective use of your Ryobi Trimmer.

Warning Labels and Symbols

Warning labels and symbols on your Ryobi Trimmer are crucial for safe operation. These labels highlight potential hazards and provide essential safety information. Common symbols include warnings for rotating parts, electrical components, and hot surfaces. Always read and understand the meaning of these labels before use. They are designed to alert you to dangers such as cutting hazards, electrical shock risks, and overheating. Pay special attention to symbols indicating protective gear requirements, such as safety glasses or gloves. Failure to heed these warnings can result in serious injury or damage. Refer to the manual for a detailed explanation of all symbols and their meanings. Ignoring these warnings can lead to accidents, so always prioritize caution and adhere to the guidelines provided.

Protective Gear Recommendations

Wearing appropriate protective gear is essential when operating a Ryobi Trimmer to minimize the risk of injury. Always wear safety glasses or goggles to protect your eyes from debris. Durable gloves improve grip and reduce vibration impact, while long sleeves and pants can prevent skin irritation from flying particles. Sturdy, closed-toe footwear is also recommended to protect your feet from accidental cuts or drops. A face mask can be useful to avoid inhaling dust or grass clippings. Ensure all clothing is snug-fitting to avoid entanglement with moving parts. By following these recommendations, you can enhance safety and ensure a secure operating experience. Protective gear is a critical component of responsible trimmer use and accident prevention.

Assembly and Initial Setup

Start by carefully unpacking and inventorying all components. Attach the trimmer head and adjust the handle to your preferred height. Follow the manual for precise assembly steps to ensure proper function and safety during use. Proper setup is crucial for optimal performance and ease of operation.

Unpacking and Inventory

Begin by carefully unpacking your Ryobi Trimmer and verifying all components against the provided parts list in the manual. Ensure no items are damaged or missing. Inspect the trimmer head, handle, battery (if applicable), and additional accessories like cutting lines or blades. Familiarize yourself with each part to understand its function. Check for any visible damage or defects and contact customer support if necessary. Properly organizing and accounting for all parts ensures a smooth assembly process. This step is crucial for identifying any potential issues before use. Take your time to ensure everything is in order and ready for assembly. A thorough inventory helps prevent delays and ensures safety during operation.

Attaching the Trimmer Head

To attach the trimmer head, align it with the shaft, ensuring the mounting holes match up. Secure the head using the provided screws or clips, tightening firmly but avoiding overtightening. Double-check the alignment to ensure proper function. Once attached, test the head by gently moving it to confirm it is securely fastened. If your model uses a quick-release mechanism, follow the specific instructions for locking the head in place. Always refer to the manual for model-specific guidance, as attachment methods may vary. Properly attaching the head ensures safe and effective operation. Take care to ensure all connections are secure before use to avoid accidents or poor performance.

Adjusting the Handle

Adjusting the handle on your Ryobi Trimmer is essential for comfortable and efficient operation. Most models feature a telescoping handle that can be extended or retracted to suit your height. To adjust, locate the locking mechanism, typically a knob or button, and release it to slide the handle to your desired length. For fixed handles, check if the angle or position can be modified for better ergonomics. Ensure the handle is securely locked in place after adjustment to prevent shifting during use. Proper handle alignment reduces fatigue and improves control. Always refer to your specific model’s manual for detailed instructions, as adjustment methods may vary slightly between models. Adjusting the handle correctly ensures a comfortable and safe trimming experience.

Operating the Trimmer

Operating your Ryobi Trimmer safely and effectively requires reading the manual, following safety guidelines, and using proper techniques. Ensure the trimmer is fully assembled and adjusted before use.

Starting the Trimmer

To start your Ryobi Trimmer, ensure all safety precautions are followed. For electric models, plug in the battery and ensure it is fully charged. For gas models, check the choke and primer. Pull the starter cord gently until resistance is felt, then pull sharply. Always wear protective gear and ensure the area is clear. Refer to the manual for specific starting procedures. If the trimmer does not start, check the fuel level, air filter, and spark plug. Ensure the trimmer head is clear of debris. Starting the trimmer correctly ensures efficient operation and prevents potential damage. Always follow the manufacturer’s guidelines for a safe and successful start.

Basic Operating Techniques

Mastering basic operating techniques ensures effective and safe use of your Ryobi Trimmer. Hold the handle firmly, keeping the trimmer head parallel to the ground. Move in controlled, steady sweeps, applying light pressure. For optimal results, maintain the cutting line 2-3 inches above the ground to avoid damaging plants. When trimming around obstacles, use short, precise strokes. Always keep the trimmer head at a slight angle to prevent debris from flying back. Regularly check the line feed and adjust as needed. Proper technique minimizes wear on the trimmer and enhances cutting efficiency. Follow these guidelines to achieve professional-looking results while maintaining safety and tool longevity.

Using the Trimmer in Different Modes

Ryobi Trimmers often feature multiple operating modes, such as trimming, edging, and brush cutting. For trimming mode, use the standard cutting line for grass and weeds. When switching to edging, adjust the trimmer head to a vertical position for precise edge work. If your model includes a brush cutter mode, install the appropriate blade for tackling thicker vegetation. Always refer to the manual for specific mode-changing instructions. Ensure the trimmer is turned off and cool before switching modes. Properly securing attachments and using the correct accessories for each mode ensures safety and efficiency. Adapting your technique to the selected mode enhances performance and extends the tool’s lifespan.

Maintenance and Care

Regular cleaning and proper storage are essential for maintaining your Ryobi Trimmer. Seasonal checks ensure optimal performance, while replacing worn parts keeps it reliable and prolongs its lifespan.

Cleaning the Trimmer

Cleaning your Ryobi Trimmer is crucial for maintaining performance and longevity. Start by disconnecting the battery or spark plug to ensure safety. Remove any debris, grass clippings, or dirt from the trimmer head and line. Use a soft brush or cloth to wipe down the exterior, paying attention to vents and openings. For stubborn dirt, mix mild detergent with water and gently scrub. Rinse thoroughly and dry to prevent rust. Regularly inspect and clean the air filter to ensure proper airflow. Check for worn or damaged parts and replace them as needed. Cleaning after each use prevents damage and keeps your trimmer in optimal condition.

Storing the Trimmer

Proper storage of your Ryobi Trimmer ensures longevity and readiness for future use. Disconnect the battery or drain fuel if it’s a gas model. Clean the trimmer thoroughly, removing dirt and debris. Store it in a dry, cool, well-ventilated area away from direct sunlight. Avoid damp or humid environments to prevent rust. For electric trimmers, wind the cord neatly to avoid tangling. Check for wear and tear, and repair or replace damaged parts before storage. Use a protective cover to shield from dust. Store the trimmer upright or in its original packaging if available. Proper storage maintains performance and prevents damage during the off-season. Always follow manufacturer guidelines for specific storage recommendations.

Seasonal Maintenance Tips

Regular seasonal maintenance ensures your Ryobi Trimmer remains in peak condition year-round. After each use, clean the trimmer head and remove debris to prevent clogging. Check and replace the cutting line or blade as needed. Inspect the air filter and spark plug, replacing them if dirty or worn. For gas models, drain the fuel tank or use a fuel stabilizer before storage. Lubricate moving parts to prevent rust and corrosion. Store the trimmer in a dry, cool place during the off-season. Before restarting in spring, perform a thorough inspection and test the trimmer. Proper seasonal care extends the lifespan and ensures reliable performance when needed.

Troubleshooting Common Issues

Address issues like uneven cutting, vibration, or battery drain. Check for worn parts, clogged air filters, or loose connections. Refer to the user manual or online troubleshooting guides for solutions.

Trimmer Not Starting

If your Ryobi Trimmer fails to start, check the power source or battery charge. Ensure the battery is fully charged and properly connected. Verify the spark plug is clean and securely installed. Check for clogged air filters or fuel lines, and ensure the fuel tank is not empty. If using a gas-powered model, confirm the choke is in the correct position. Consult the user manual for specific troubleshooting steps, as different models may have unique requirements. If issues persist, contact Ryobi customer support or visit an authorized service center for professional assistance.

Line Feed Problems

Line feed issues are common and can usually be resolved with simple adjustments. Ensure the cutting line is correctly installed according to the manual. If the line isn’t advancing, check for tangles or debris in the spool. Clean the spool and rewind the line properly. For automatic feed models, tap the head gently on the ground to activate the feeding mechanism. If manual feeding is required, stop the engine and pull out additional line. Avoid overloading the spool, as this can cause malfunctions. Regularly inspect and replace worn or damaged lines to maintain optimal performance.

Overheating Issues

Overheating can occur due to blocked air vents, excessive use, or improper maintenance. Ensure airflow by keeping vents clean and free from debris. Avoid continuous operation without breaks, as this strains the motor. If overheating occurs, turn off the trimmer and allow it to cool. Regularly inspect and clean the cooling system to prevent future issues. Use the correct cutting line size and type, as thicker lines can cause increased friction and heat buildup. Always follow the manufacturer’s guidelines for operation and maintenance to avoid overheating problems and extend the lifespan of your Ryobi Trimmer.

Repair and Replacement

Identify wear and tear early to prevent major repairs. Replace damaged or worn parts with genuine Ryobi components to ensure safety and optimal performance.

Identifying Wear and Tear

Regularly inspect your Ryobi Trimmer for signs of wear and tear to prevent performance issues. Check the power cord for fraying, the cutting blade for dullness, and the trimmer line for depletion. Inspect the engine for leaks or damage, and ensure all moving parts are lubricated. Look for worn-out handles or loose connections, as these can affect control and safety. Consult the user manual for part numbers and diagrams to identify components needing replacement. Addressing wear early prevents costly repairs and ensures safe operation. Replace damaged parts with genuine Ryobi components to maintain optimal performance and longevity. Regular maintenance extends the life of your trimmer and keeps it running efficiently.

Replacing the Trimmer Line

To replace the trimmer line, start by turning off the engine and allowing it to cool. Wear gloves to protect your hands from sharp edges. Locate the spool at the trimmer head and remove any remaining line. Measure and cut a new piece of trimmer line to the recommended length specified in your manual. Wind the line neatly around the spool, ensuring it is properly seated. Replace the spool cover securely. Test the trimmer to ensure the line feeds correctly and cuts efficiently. Always use genuine Ryobi replacement parts to maintain performance and safety. If unsure, refer to the manual or contact Ryobi support for assistance. Regular line replacement ensures optimal cutting performance and extends the life of your trimmer.

Repairing or Replacing the Motor

Repairing or replacing the motor requires caution and adherence to manufacturer guidelines. First, disconnect the battery or spark plug to ensure safety. Inspect the motor for signs of wear, such as worn brushes or damaged wiring. For electric motors, check for overheating issues or short circuits. If repairs are needed, consult the parts manual for compatible replacements. For gas-powered motors, inspect the air filter and carburetor for blockages. If the motor is beyond repair, replace it with a genuine Ryobi part to ensure compatibility and performance. Always follow the manual’s instructions for disassembly and reassembly. If unsure, contact Ryobi’s customer support or visit an authorized service center for professional assistance. Proper maintenance ensures the motor operates efficiently and prolongs the trimmer’s lifespan.

Environmental Considerations

Eco-friendly practices are crucial for minimizing environmental impact. Proper disposal of old parts and sustainable battery care help reduce waste, promoting eco-conscious gardening habits responsibly.

Eco-Friendly Usage Tips

Adopting eco-friendly practices with your Ryobi Trimmer helps minimize environmental impact. Use rechargeable batteries to reduce waste and opt for energy-efficient modes when possible. Avoid over-trimming to preserve plant life and biodiversity. Regularly maintain your trimmer to ensure optimal performance, reducing the need for excessive fuel or energy use; Properly dispose of old parts and batteries through recycling programs to prevent environmental contamination. Consider using biodegradable cutting lines if available. Additionally, avoid trimming in sensitive ecosystems or during peak wildlife activity to protect local flora and fauna. By following these tips, you can enjoy a well-manicured lawn while promoting sustainable gardening practices.

Proper Disposal of Old Parts

Proper disposal of old Ryobi Trimmer parts is crucial for environmental protection. Always recycle batteries, motors, and metal components through designated facilities. Check local regulations for guidelines on hazardous waste disposal. Never discard parts in regular trash, as they may contain harmful materials. Use community recycling centers or manufacturer programs for safe disposal. Additionally, donate reusable parts like handles or accessories if still functional. Ensure all liquids, such as fuel or oil, are drained and disposed of according to local environmental standards. By responsibly managing waste, you contribute to a sustainable future and prevent potential ecological harm. Always follow local recycling guidelines for proper disposal processes.

By following these guidelines, you ensure proper usage, maintenance, and environmental responsibility, enhancing your Ryobi Trimmer’s performance and lifespan while promoting eco-friendly practices.

Final Tips for Optimal Performance

For your Ryobi Trimmer to perform at its best, always adhere to the manufacturer’s guidelines. Regularly clean the trimmer head and check for wear and tear. Store the tool in a dry, cool place to prevent rust and damage. Use the correct trimmer line thickness for your tasks, and avoid overloading the machine. Keep the cutting area clear of debris to ensure smooth operation. Properly charge the battery if using a cordless model, and refer to the manual for seasonal maintenance tips. By following these steps, you’ll maintain your trimmer’s efficiency and extend its lifespan, ensuring years of reliable service.

Importance of Regular Maintenance

Regular maintenance is crucial for extending the life of your Ryobi Trimmer and ensuring consistent performance. Over time, components like the trimmer line, motor, and handles can wear out. By inspecting these parts regularly and replacing them when necessary, you prevent unexpected breakdowns. Cleaning the trimmer head after each use helps remove debris that could cause corrosion or clog the cutting mechanism. Additionally, proper storage and seasonal checks ensure the trimmer remains in good working condition. Neglecting maintenance can lead to reduced efficiency and potential safety hazards. Stay proactive with routine care to keep your Ryobi Trimmer operating smoothly and safely throughout the year.

whitening strips instructions

What are Whitening Strips?

Whitening strips are thin‚ flexible pieces of plastic coated with a gel containing a whitening agent․ These strips are designed to be applied to the teeth‚ delivering the whitening agent to the enamel and helping to remove stains and discoloration for a brighter smile․

How Whitening Strips Work

The effectiveness of whitening strips lies in the bleaching agents present in the gel coating․ These agents‚ typically hydrogen peroxide or carbamide peroxide‚ penetrate the enamel layer of the teeth․ This process breaks down stain molecules that cause discoloration from factors like coffee‚ smoking‚ or aging․ When the whitening agent comes into contact with these stain molecules‚ a chemical reaction occurs‚ lightening the overall appearance of the teeth․ The strips ensure consistent contact between the gel and the tooth surface‚ maximizing the whitening effect during the application period․ This convenient method gradually lifts stains‚ resulting in a noticeably brighter smile with regular use‚ following the product instructions․

Ingredients in Whitening Strips

The primary active ingredients in whitening strips are typically hydrogen peroxide or carbamide peroxide․ These compounds act as bleaching agents‚ breaking down stain molecules on the teeth․ Other common ingredients include glycerin‚ which helps maintain moisture and consistency‚ and water‚ serving as a solvent․ Some strips contain flavoring agents to improve taste and reduce the chemical aftertaste․ Thickeners like carbomer may be added to enhance the gel’s viscosity‚ ensuring it adheres properly to the teeth․ Additionally‚ ingredients like sodium hydroxide might be present to adjust the pH level for optimal whitening․ Certain brands may also incorporate potassium nitrate to reduce tooth sensitivity during the whitening process‚ offering a more comfortable experience․

Preparing to Use Whitening Strips

Before applying whitening strips‚ ensure your teeth are clean by brushing and flossing․ This removes plaque and food particles‚ allowing the strips to adhere properly and maximize contact with the tooth surface for effective whitening․

Brushing and Flossing Before Application

Prior to using whitening strips‚ thorough oral hygiene is crucial․ Begin by brushing your teeth to eliminate any surface debris or plaque․ It’s often recommended to avoid using toothpaste immediately before applying the strips‚ as some ingredients may interfere with the whitening process․ If you choose to brush‚ use a fluoride-free option․

Next‚ floss carefully to remove food particles and plaque from between your teeth․ This step ensures that the whitening strips make direct contact with all tooth surfaces‚ promoting even and effective whitening․ By creating a clean surface‚ you optimize the strip’s adherence and overall results‚ leading to a brighter smile․ Remember to smile in front of a mirror․

Applying Whitening Strips: A Step-by-Step Guide

To apply whitening strips‚ peel them from their backing and gently press the gel side against your teeth․ Ensure proper alignment and contact for optimal whitening results․ Follow the manufacturer’s specific instructions for wear time․

Aligning the Strips

Careful alignment is essential for effective teeth whitening with strips․ Begin by identifying the edge of the strip intended for the gumline․ Position this edge precisely along your gumline‚ ensuring it neither overlaps onto the gums nor leaves a gap exposing the tooth․ Use a mirror to aid in precise placement‚ especially for the back teeth․ Gently press the strip against the teeth‚ conforming it to the natural curves of your smile․ Avoid air pockets or wrinkles that could hinder contact between the whitening gel and the tooth surface․ Accurate alignment ensures consistent whitening and minimizes gum irritation‚ contributing to a more comfortable and successful whitening experience․ Remember that the sticky gel side should always make contact with your teeth․

Securing the Strips

Once the whitening strip is aligned along the gumline‚ it’s crucial to ensure it’s securely adhered to the teeth․ Gently press the strip against the front surface of your teeth‚ using your fingers to mold it into the contours of your smile․ Focus on achieving full contact between the whitening gel and your teeth․ Some strips may have excess material; fold this over the back of your teeth to help keep the strip in place․ The key is a firm‚ even pressure that eliminates air pockets and prevents the strip from slipping during the treatment․ Proper adhesion maximizes the whitening effect‚ allowing the gel to work effectively and evenly across your teeth․ Crest AdvancedSEAL technology provides a form fit‚ no-slip grip that molds and adheres to teeth for a better whitening experience․

How Long to Wear Whitening Strips

The duration for wearing whitening strips varies depending on the brand and the strength of the whitening agent․ Typically‚ strips are worn for 5 minutes to 45 minutes per application; Always adhere to the instructions provided with your specific whitening strip product for the best and safest results․ Exceeding the recommended time can lead to tooth sensitivity or gum irritation‚ without necessarily enhancing the whitening effect․ Some advanced strips are designed for longer wear times‚ while others are formulated for quick‚ convenient use․ Pay close attention to the recommended time per application to avoid any potential discomfort․ Crest Whitestrips‚ for example‚ are often used for 30-45 minutes․ Remember‚ consistency is key‚ so follow the recommended wear time each day for optimal whitening․

What to Do After Removing Whitening Strips

After removing whitening strips‚ rinse your mouth thoroughly with water to remove any residual gel․ You can then brush and floss as normal to ensure complete removal of the whitening agent․

Rinsing Your Mouth

After the recommended wear time‚ carefully peel the whitening strips off your teeth․ Once the strips have been removed‚ it’s crucial to rinse your mouth thoroughly with lukewarm water․ This action helps to eliminate any remaining whitening gel residue that may be clinging to your teeth or gums‚ preventing prolonged exposure to the whitening agents․

Gently swish the water around your mouth‚ ensuring that all areas are reached‚ and then spit it out․ Avoid swallowing any of the residual gel‚ as it may cause mild stomach upset․ Rinsing also aids in reducing any potential irritation to the gums that might occur from the whitening agents․ This step is a simple yet effective way to maintain good oral hygiene after each whitening treatment․

Maintaining Whitened Teeth

To prolong the effects of whitening strips‚ adopt good oral hygiene habits․ This includes regular brushing and flossing․ Additionally‚ be mindful of your diet to avoid staining agents‚ ensuring a lasting‚ bright smile․

Foods and Drinks to Avoid

To maintain your newly whitened teeth‚ it’s crucial to be mindful of your diet․ Certain foods and drinks can quickly stain your teeth‚ undoing the effects of the whitening strips․ Dark-colored beverages like coffee‚ tea‚ red wine‚ and sodas are notorious for causing stains․ Similarly‚ deeply pigmented foods such as berries‚ soy sauce‚ balsamic vinegar‚ and tomato-based sauces can also contribute to discoloration․

It’s best to limit your intake of these items‚ especially in the days and weeks following your whitening treatment․ If you do consume them‚ consider rinsing your mouth with water afterward to minimize their contact with your teeth․ Remember‚ prevention is key when it comes to maintaining a bright‚ white smile after using whitening strips․

Using a Straw

One simple yet effective way to protect your whitened teeth from staining beverages is to use a straw․ When you drink through a straw‚ the liquid bypasses your front teeth‚ minimizing its contact with the enamel․ This is particularly helpful for enjoying staining drinks like coffee‚ tea‚ soda‚ and juice without compromising your bright smile․

Consider using a reusable straw to reduce plastic waste and be environmentally conscious․ If you’re not a fan of straws‚ rinsing your mouth with water after consuming staining beverages can also help․ Remember‚ every little bit helps in maintaining your whitened teeth and keeping your smile looking its best for longer․ Make using a straw a habit to prolong the effects of whitening strips․

Dealing with Sensitivity

Tooth sensitivity is a common side effect of whitening strips․ If you experience discomfort‚ consider using a toothpaste designed for sensitive teeth․ These toothpastes contain ingredients that help to soothe and protect the nerves in your teeth․

Using Sensitive Toothpaste

If you experience tooth sensitivity while using whitening strips‚ switching to a sensitive toothpaste can provide relief․ These toothpastes are formulated with ingredients like potassium nitrate or stannous fluoride‚ which help to desensitize the nerve endings in your teeth‚ reducing discomfort․ Use sensitive toothpaste as your regular toothpaste during and after your whitening treatment․ Brush gently and thoroughly‚ paying attention to areas where sensitivity is most pronounced․

Continue using the sensitive toothpaste for at least two weeks after completing your whitening strip regimen to help maintain reduced sensitivity․ If sensitivity persists or worsens‚ consult your dentist for further evaluation and recommendations; They may suggest other desensitizing treatments or adjust your whitening schedule to minimize discomfort․ Remember to follow the instructions of your dentist!

Frequency of Use and Maintenance

The frequency of whitening strip use depends on the specific product and your desired level of whiteness․ Most whitening strips are designed for daily use over a period of 1-2 weeks for initial whitening․ After achieving your desired shade‚ maintenance treatments are crucial to prolong the results․

Consider using whitening strips once a month or every few months as a refresher to maintain brightness․ You can also alternate between whitening toothpaste and fluoride toothpaste for daily oral hygiene․ Consistent oral hygiene practices‚ including regular brushing and flossing‚ are essential for maintaining whitened teeth․ Limiting stain-causing foods and drinks and using a straw can further preserve your bright smile․ Remember to consult your dentist․

oklahoma jury instructions

Oklahoma Jury Instructions are critical for ensuring fair trials. They guide juries in applying the law correctly. These instructions help maintain consistency across different cases. The Oklahoma Supreme Court oversees these instructions. They are essential for the uniform administration of justice in Oklahoma courts. Properly crafted instructions help juries understand their duties.

Oklahoma Jury Instructions are fundamental to the judicial process in Oklahoma. These instructions provide jurors with a clear understanding of the legal principles that govern the case they are deciding. The instructions are crafted to ensure that jurors apply the law accurately and consistently. The Oklahoma Supreme Court plays a vital role in the development and maintenance of these instructions. This ensures that they reflect the most current legal standards. Uniformity in jury instructions is essential for fair and impartial trials.

Oklahoma Uniform Jury Instructions (OUJI) are designed to be accessible and understandable for the average juror. They cover a wide range of legal topics and are tailored to specific types of cases, including civil, criminal, and juvenile matters. The goal is to minimize confusion and ensure that jurors can make informed decisions based on the evidence presented and the applicable law. The instructions also help to prevent verdicts based on personal opinions or biases. They are designed for the equal and uniform administration of justice.

Purpose of Jury Instructions in Oklahoma Courts

The primary purpose of jury instructions in Oklahoma courts is to guide jurors in their deliberations. They ensure that jurors understand the relevant laws. This helps them apply those laws correctly to the facts presented at trial. Jury instructions serve as a roadmap, directing jurors through the legal issues they must consider to reach a verdict. By providing clear and concise explanations of the law, jury instructions minimize the risk of misinterpretation or confusion;

These instructions promote fairness by ensuring that all jurors receive the same legal guidance. This reduces the likelihood of inconsistent verdicts across similar cases. Oklahoma Uniform Jury Instructions (OUJI) are designed to be neutral and objective, avoiding any bias or prejudice. The purpose is to assist jurors in making impartial decisions based solely on the evidence and the law. Moreover, jury instructions protect the rights of all parties involved in the litigation. Proper instructions are vital for upholding the integrity of the judicial system.

Types of Oklahoma Jury Instructions

Oklahoma jury instructions are categorized into several types to address different legal contexts. Civil jury instructions guide jurors in civil cases. These cases involve disputes between individuals or entities. Criminal jury instructions are tailored for criminal trials, where the state prosecutes an individual for alleged offenses. Juvenile jury instructions are specifically designed for juvenile court proceedings. These proceedings address matters involving minors.

Within each category, instructions cover various aspects of the law. Introductory instructions provide general guidance to the jury. They explain their duties and responsibilities. Substantive instructions address the specific legal elements of the claims or charges; These elements need to be proven. Evidentiary instructions guide the jury on how to evaluate different types of evidence.

Oklahoma Uniform Jury Instructions (OUJI) are available for civil, criminal, and juvenile cases. These uniform instructions promote consistency across courts. Special instructions may also be given to address unique issues in a particular case. The goal is to ensure that the jury is fully informed about the applicable laws.

Oklahoma Uniform Jury Instructions (OUJI)

The Oklahoma Uniform Jury Instructions (OUJI) provide standardized guidance. These instructions are used in civil, criminal, and juvenile cases. OUJI ensures consistency and clarity for juries. They are essential for fair and impartial trials across Oklahoma courts.

Civil Jury Instructions

Civil jury instructions in Oklahoma are designed to guide jurors through the complexities of civil law. These instructions cover a wide range of topics, including contract disputes, personal injury claims, and property rights. The Oklahoma Supreme Court Committee for Uniform Civil Jury Instructions develops and updates these instructions. The goal is to ensure that jurors receive clear and accurate explanations of the legal principles applicable to the case before them.

These instructions outline the elements a plaintiff must prove to succeed in their claim. They also explain the defenses available to the defendant. Standardized language helps minimize confusion and promotes consistency in verdicts. The instructions also address issues. They cover issues such as burden of proof, witness credibility, and damages. The Oklahoma Uniform Jury Instructions (OUJI) applicable in a civil case shall include an instruction notifying the jury that no part of an award for damages for personal injury or wrongful death is subject to state or federal income tax.

Recent revisions and additions ensure they reflect current law. These instructions are a critical resource for attorneys and judges.

Criminal Jury Instructions

Oklahoma’s criminal jury instructions are crucial for ensuring fair trials in criminal cases. These instructions provide jurors with a clear understanding of the laws. They also clarify the elements of the crimes charged. The Oklahoma Uniform Jury Instructions (OUJI) ⎼ Criminal are regularly updated. The Oklahoma Criminal Jury Instructions cover topics such as burden of proof and reasonable doubt. They also cover specific elements of various criminal offenses.

These instructions guide jurors in evaluating evidence; They assist jurors in applying the law to the facts presented at trial. Instructions also address potential defenses. They address defenses such as self-defense or insanity. Proper instructions help ensure that defendants receive a fair trial. They also protect the rights of the accused while ensuring public safety.

Current Oklahoma Uniform Jury Instructions (Criminal) may be found on the OCCA website. The instructions are located under the dropdown navigation for Court Resources and then Jury Instructions. The criminal instructions are essential for a just legal process. They provide a framework for jurors to reach informed and impartial verdicts. They are regularly reviewed by the Oklahoma Supreme Court.

Juvenile Jury Instructions

Oklahoma’s juvenile jury instructions address legal proceedings involving minors. These instructions differ from adult criminal instructions. They reflect the unique nature of juvenile law. The focus is often on rehabilitation rather than punishment. These instructions guide juries in cases involving juvenile delinquency. They cover status offenses and other matters specific to minors.

Oklahoma Uniform Jury Instructions-Juvenile address the specific legal standards. They address the standards applicable in juvenile court. These instructions address issues such as parental rights. They also address child custody and the Indian Child Welfare Act. The instructions ensure that juries understand the best interests of the child. They also provide a framework for making informed decisions.

These instructions are designed to protect the rights of juveniles. They are regularly reviewed to reflect changes in the law. The Oklahoma Supreme Court oversees the development and updates. These instructions are vital for ensuring fair and just outcomes. They help promote the well-being of children involved in the legal system. Jury instructions play a critical role in the juvenile justice system.

Accessing Oklahoma Jury Instructions

Oklahoma Jury Instructions are accessible through various resources. The Oklahoma Supreme Court provides some access. Legal databases like Westlaw offer comprehensive collections. These resources ensure legal professionals can easily find and use the correct instructions. Access promotes fair and consistent application of the law.

Oklahoma Supreme Court Resources

The Oklahoma Supreme Court is a primary source for accessing official Oklahoma Jury Instructions. The court’s website often hosts the most current versions of both civil and criminal jury instructions. These resources are invaluable for legal professionals seeking accurate and up-to-date information. The Oklahoma Supreme Court Committee plays a significant role in revising and updating these instructions.

The court’s resources may include downloadable PDFs or searchable databases. These resources facilitate easy access and navigation. The Supreme Court’s involvement ensures the instructions reflect the latest legal standards. Lawyers often rely on the Supreme Court’s resources to prepare for trials.

The Oklahoma Supreme Court also provides access to case opinions related to jury instructions. Analyzing these opinions helps understand how instructions are interpreted by the courts. This insight is crucial for crafting effective arguments and objections during trial. The court continually updates resources to reflect changes in law.

Westlaw and Legal Solutions from Thomson Reuters

Westlaw, a service from Thomson Reuters, provides extensive resources for Oklahoma Jury Instructions. These resources include annotated versions, practice guides, and expert analysis. Westlaw offers access to current and past versions of the Oklahoma Uniform Jury Instructions (OUJI). This access is essential for comprehensive legal research. The platform also provides links to relevant case law and statutes.

Thomson Reuters offers the “Oklahoma Jury Instruction Handbook,” a practical resource for attorneys. This handbook compiles jury instructions with insightful commentary and legal references. It is updated regularly to reflect changes in law. Westlaw’s advanced search capabilities allow users to quickly find specific instructions.
Legal professionals rely on Westlaw for its accuracy and comprehensive coverage. The platform integrates seamlessly with other legal research tools. Thomson Reuters’ solutions enhance trial preparation and courtroom advocacy. Accessing Oklahoma Jury Instructions through Westlaw ensures attorneys have the resources they need.

Objections to Jury Instructions

Objections to jury instructions are a critical part of the trial process. They preserve legal issues for appeal. Oklahoma courts have specific rules for making objections. These rules ensure a fair and accurate trial. Timely objections are crucial for challenging instructions.

Procedure for Making Objections

In Oklahoma, the procedure for objecting to jury instructions is well-defined to ensure fairness and accuracy in legal proceedings. Attorneys must clearly state their objections on the record, specifying the exact portion of the instruction they challenge and the legal basis for their objection. This detailed approach allows the trial judge to understand the specific issues and make informed decisions.

Objections should be made outside the hearing of the jury to avoid influencing their deliberations. This practice ensures that the jury remains impartial and focuses solely on the evidence presented. Preliminary objections should be raised during the jury instruction conference, providing an opportunity for discussion and potential revisions.

The court provides an opportunity to make the objection and record outside the hearing of the jury. The attorneys must be ready to cite relevant case law or statutes supporting their position. Failure to properly object can result in the waiver of the issue on appeal, making it crucial for attorneys to adhere to these procedural requirements.

Timing of Objections

The timing of objections to jury instructions in Oklahoma is crucial to preserving legal arguments for appeal. Generally, objections must be made before the jury retires to deliberate. This allows the trial judge an opportunity to correct any errors in the instructions before they influence the jury’s decision.

Oklahoma law requires that parties be given an opportunity to object to the instructions outside the hearing of the jury. Preliminary objections are typically addressed during the jury instruction conference, where attorneys can raise concerns and propose alternative language. This conference is a critical stage for shaping the instructions and ensuring they accurately reflect the law.

If an attorney fails to object to a jury instruction at the appropriate time, the objection may be waived on appeal, unless the error constitutes fundamental error. Fundamental error is an error that goes to the foundation of the case or deprives a party of a substantial right. Therefore, diligent attention to the timing of objections is essential for effective advocacy in Oklahoma courts.

990 schedule j instructions

Form 990 Schedule J Instructions: An Overview

Schedule J supplements Form 990‚ offering a detailed compensation breakdown for specific individuals within the organization․ It is used by nonprofits and exempt organizations․ This document is where highly compensated leaders of the organization are reported․ The Form 990 instructions define key terms for accurate reporting․

Purpose of Schedule J

The primary purpose of Schedule J is to provide transparency regarding the compensation practices of nonprofit organizations․ As a supplement to Form 990‚ it offers a detailed breakdown of compensation provided to certain officers‚ directors‚ trustees‚ key employees‚ and the five highest compensated employees․ This detailed reporting allows the IRS and the public to scrutinize executive compensation arrangements‚ ensuring that these organizations operate in a manner consistent with their tax-exempt status․

Specifically‚ Schedule J aims to identify any potential excess benefit transactions‚ where individuals may be receiving unreasonable compensation or benefits․ By requiring organizations to disclose various forms of compensation‚ including salaries‚ bonuses‚ deferred compensation‚ and non-cash benefits‚ the IRS can better assess whether the organization is adhering to the rules governing executive compensation for tax-exempt entities․

Furthermore‚ the information reported on Schedule J assists in promoting public trust and confidence in the nonprofit sector․ By making compensation information publicly available‚ it enables donors‚ stakeholders‚ and the general public to evaluate whether the organization is using its resources responsibly and effectively․

Who Needs to File Schedule J

Schedule J of Form 990 is not a universal requirement for all tax-exempt organizations․ Generally‚ organizations that answered “Yes” on Form 990‚ Part IV‚ line 25‚ regarding excess benefit transactions‚ must complete Schedule J․ Additionally‚ organizations must file Schedule J if they report compensation from the organization and related organizations to certain individuals exceeding a threshold amount․ This threshold applies to individuals listed in Part VII‚ Section A of Form 990․

Specifically‚ if an individual’s total reportable compensation from the organization and related organizations exceeds $150‚000‚ and they are listed as an officer‚ director‚ trustee‚ key employee‚ or one of the five highest compensated employees‚ then Schedule J must be filed to provide a detailed breakdown of their compensation․ It’s crucial for organizations to carefully review the compensation paid to these individuals to determine if the filing requirement is triggered․

Failure to file Schedule J when required can result in penalties and increased scrutiny from the IRS․ Therefore‚ organizations should maintain accurate records of compensation paid to their officers‚ directors‚ trustees‚ key employees‚ and highly compensated employees to ensure compliance with Form 990 reporting requirements․

Reporting Compensation: General Guidelines

When reporting compensation on Schedule J of Form 990‚ organizations must adhere to specific guidelines to ensure accuracy and compliance․ Compensation includes not only salary and wages but also various other forms of payment and benefits provided to officers‚ directors‚ trustees‚ key employees‚ and certain highly compensated employees․ It’s crucial to include all forms of compensation‚ whether direct or indirect‚ in the reported amounts․

Reportable compensation encompasses items such as bonuses‚ incentive compensation‚ deferred compensation‚ and payments made on behalf of the individual‚ such as contributions to retirement plans or health insurance premiums․ The fair market value of non-cash compensation‚ such as the use of a company car or housing‚ must also be included․ Furthermore‚ organizations should carefully consider compensation paid by related organizations when determining reportable amounts․

Clear documentation and record-keeping are essential for accurate compensation reporting․ Organizations should maintain detailed records of all payments and benefits provided to covered individuals‚ including the dates‚ amounts‚ and nature of each payment․ Consulting with a qualified tax professional can help ensure compliance with the complex compensation reporting requirements of Schedule J and Form 990․

Part II of Schedule J: Deferred Compensation

Part II of Schedule J focuses specifically on deferred compensation‚ requiring organizations to report details about compensation arrangements where payment is delayed to a future period․ This section is crucial for transparency‚ as it reveals commitments made to individuals that will impact the organization’s future financial obligations․ Understanding the nuances of deferred compensation reporting is essential for accurate completion of Schedule J․

Column (C) of Part II is where organizations enter all current-year deferrals of compensation․ This includes amounts that have been earned by the individual during the reporting year but will not be paid out until a later date․ Examples include contributions to nonqualified deferred compensation plans and other arrangements where payment is postponed․

It’s important to note that the reporting requirements for deferred compensation can be complex‚ especially when dealing with intricate plan designs or changes in deferral arrangements․ Organizations should carefully review the instructions for Schedule J and consult with tax professionals to ensure accurate and complete reporting of all deferred compensation arrangements․

Compensation Reporting Period

When completing Form 990 and Schedule J‚ it is essential to understand the specific period for which compensation must be reported․ The compensation reported in Part VII‚ Section A of Form 990‚ as well as in Schedule J‚ should align with the organization’s tax year․ This means that you must report all compensation paid or accrued during that 12-month period․

This includes salary‚ bonuses‚ and other forms of compensation‚ regardless of when the services were performed․ For instance‚ if a bonus was earned in the prior year but paid out during the current reporting period‚ it should be included in the current year’s compensation figures․ Consistency in reporting periods is critical for accurate financial transparency․

Organizations must maintain detailed records of all compensation paid or accrued to ensure accurate reporting․ This includes tracking the dates of payments and the specific periods to which the compensation relates․ Proper documentation will help support the figures reported on Form 990 and Schedule J and facilitate compliance with IRS regulations․

Schedule J and Form 990: Filing Together

Schedule J is designed as a supplemental form that provides detailed information related to executive compensation‚ and it must be filed alongside Form 990․ When submitting Schedule J‚ it’s crucial to include it with your Form 990 to ensure that the IRS receives a comprehensive overview of your organization’s financial activities and compensation practices․

Filing Schedule J without Form 990‚ or vice versa‚ could lead to processing delays or even rejection of your submission․ To prevent any issues‚ double-check that both forms are accurately completed and included in the same submission package․ This ensures that all required information is available for review by the IRS․

Remember that Schedule J provides a detailed breakdown of compensation offered to specific individuals within the organization․ It is a critical component of Form 990‚ offering insights into the allocation of resources and how the organization compensates its leadership․ Accurate and complete filing of both forms is essential for maintaining compliance and transparency․

Electronic Filing of Form 990 and Schedule J

Organizations are generally required to file Form 990 and Schedule J electronically through an IRS-approved e-file provider․ The IRS e-file system offers a secure and efficient method for submitting these forms‚ ensuring timely receipt and processing of your organization’s information․

To electronically file Form 990 and Schedule J‚ you will need to select an authorized e-file provider that supports these specific forms․ These providers offer software or online platforms that guide you through the filing process‚ helping you accurately complete the required information and submit it to the IRS electronically․

Before you begin the electronic filing process‚ gather all necessary documentation‚ including financial records‚ compensation details‚ and other relevant information․ Ensure that you have a stable internet connection and that your computer meets the minimum system requirements specified by the e-file provider․

After you have completed the forms using the e-file provider’s platform‚ carefully review all the information for accuracy and completeness․ Once you are satisfied that everything is correct‚ you can electronically sign and submit the forms to the IRS․ You will typically receive an acknowledgement from the IRS confirming receipt of your submission․

Understanding Key Employee Definition (Schedule J Instructions)

The Schedule J instructions provide a specific definition of a “key employee‚” which is crucial for determining who must have their compensation details reported on the schedule․ A key employee is typically defined as someone who meets certain criteria related to their responsibilities‚ influence‚ and compensation within the organization․

Generally‚ a key employee includes officers‚ directors‚ and trustees․ It also includes individuals having responsibilities‚ powers‚ or influence over the organization similar to those of officers․ The instructions provide detailed guidance on how to determine who qualifies based on these factors․

Furthermore‚ the key employee definition often includes individuals who are among the highest-paid employees of the organization․ The specific compensation threshold that triggers key employee status is outlined in the Schedule J instructions and may be adjusted annually by the IRS․

It is essential to carefully review the Schedule J instructions to understand the precise definition of a key employee for the reporting year․ Accurately identifying key employees is critical for complying with Form 990 reporting requirements and ensuring transparency in executive compensation practices within the organization․

Areas of Interest in Schedule J for Executive Compensation

Schedule J is a focal point for those examining executive compensation within nonprofit organizations․ It offers a detailed breakdown of compensation provided to specific individuals‚ enabling stakeholders to assess the fairness and reasonableness of these payments․ Scrutiny often centers on several key areas within the schedule․

One area of interest is the total compensation package for key employees‚ including salary‚ bonuses‚ and other forms of remuneration․ This allows for comparison against similar organizations and industries to evaluate whether compensation levels are justified․

Deferred compensation arrangements also attract attention․ Schedule J requires the reporting of current-year deferrals‚ providing insight into long-term incentive plans and retirement benefits offered to executives․ This helps assess the overall financial incentives and potential future payouts․

Furthermore‚ the schedule sheds light on expense accounts and discretionary spending․ These areas are reviewed to ensure that expenses are reasonable and properly documented‚ avoiding potential misuse of organizational funds․

Transparency regarding compensation policies and decision-making processes is crucial․ Schedule J provides valuable information for stakeholders to evaluate executive compensation practices and assess whether they align with the organization’s mission and values;

genie universal garage door opener instructions

Importance of Proper Programming

Understanding Genie Universal Remote Programming

Programmable Genie Remotes and Wall Consoles

Programmable Genie remotes and wall consoles are designed to work seamlessly with Genie garage door openers, using advanced technology to provide secure and convenient access to the garage. The remotes and wall consoles can be programmed to operate multiple garage doors, making them ideal for homes with multiple garages. The programming process is relatively simple, involving a series of steps that are outlined in the user manual. The remotes and wall consoles are also compatible with a range of Genie garage door openers, including older models, making them a great option for those looking to upgrade their existing system. With their advanced features and user-friendly interface, programmable Genie remotes and wall consoles are a great choice for anyone looking to add convenience and security to their garage door system. They are also easy to install and can be mounted on the wall or carried in a pocket or purse.

Step-by-Step Programming Instructions

Clearing Existing Settings and Programming New Remotes

Compatibility and Specifications of Genie Universal Remotes

Genie Master Universal Remote Compatibility Chart

The Genie Master Universal Remote Compatibility Chart is a useful tool for determining which remotes are compatible with specific garage door openers. This chart provides a comprehensive list of compatible models, including Genie 390MHz remotes on 9-switch, 12-switch and 9-switch trinary formats. By consulting this chart, users can easily identify the correct remote for their garage door opener, ensuring seamless operation and convenience. The chart also includes information on replacement remotes, such as the GIT-1, GIT-2, and GIT-3, as well as the GIC90-1, GIC90-2, and GIC90-3. Additionally, the chart covers the GICTD-1, GICT390-1, GIFT390-1, G2T-2, and G2T-3 models, making it a valuable resource for anyone looking to program or replace their Genie universal remote. With this chart, users can quickly and easily find the right remote for their needs, saving time and effort in the process. The chart is available online, making it easily accessible to anyone with an internet connection.

Troubleshooting Common Programming Issues

Resetting Genie Remotes and Wall Consoles

and Additional Resources for Genie Universal Garage Door Opener Instructions

The Genie universal garage door opener instructions provide a comprehensive guide for programming and troubleshooting, and with the completion of these steps, users can confidently operate their garage door openers. For additional support, users can visit the official Genie website or consult online forums and communities, where they can find FAQs, user manuals, and troubleshooting guides. The website also offers a range of resources, including video tutorials and downloadable PDF guides, to help users get the most out of their Genie universal garage door openers. Furthermore, users can contact Genie’s customer support team for personalized assistance and guidance. By utilizing these resources, users can ensure a smooth and hassle-free experience with their Genie universal garage door openers. The instructions and resources provided are designed to be user-friendly and accessible, making it easy for users to find the help they need. With the right guidance and support, users can enjoy the convenience and reliability of their Genie universal garage door openers.